Leaderboard

Popular Content
Showing content with the highest reputation on 11/16/2021 in all areas
-

LS4 swap begins
carkhz316 reacted to crazyd for a topic
Just bought an '08 GXP LS4 and have been getting familiar with it. It's a glorious engine, and it happened because I was thinking randomly what it would take to put an LS4 in my '92. My suggestions: Don't go crazy with the cam, you'll regret it with a 284. Cammed engines on manual transmissions are not merely challenging, they are next to impossible to tune for smooth drivability, and you'll feel every little quirk in the tune that'll make you forever try to fix it and hate the swap in the end. Nobody else will tell you this, but trust me I've learned the hard way on multiple cars. Stay as close to the factory tune and specification as you possibly can on a manual-trans swap. The engine already makes over 300HP stock, and you're putting it through the same wheels you use to steer. And now you're doing it through a trans that's short-geared for a high-revving V6. It's already more than enough. Get the output-shaft support bearings that replace the oil seals for the 284. It's Fitzall/TeckPak 75125LRB.1 point -

Composite brake rotors.
cessna reacted to Schurkey for a topic
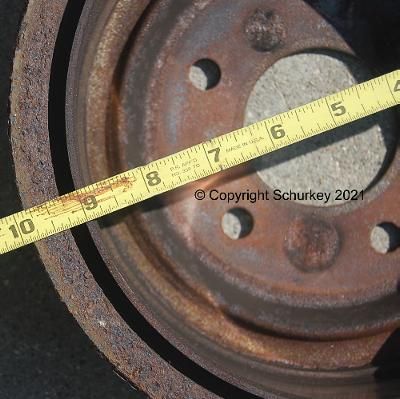
Just to finish this up, I pulled the rear drums, verified that the rear brakes were in altogether too perfect condition--41K miles, the shoes look like they were installed two months ago. The rear brakes must hardly work, which explains why the front pads haven't lasted. (second set down to the rivets!) I dicked with the rear adjusters, tightened them up some. They're supposed to self-adjust when the park brake is used...but it's a fookin' automatic transmission, I don't use the park brake. The Leading/Trailing shoe brake design is piss-poor engineering as far as I'm concerned, 'cause I'm not the only person who doesn't stamp the park brake--which means the rear shoes never adjust. Adding insult to injury, the damned rear drums are less than 9 inches in diameter, with narrow shoes. How powerful could they be? Fookin' GM, cutting corners on the 2nd Gen W-bodies by making disc rear brakes optional when the older cars had decent rear discs as standard equipment. Anyway, I flushed brake fluid through six bleeder valves--one at each wheel, plus two on the ABS unit. Flushed until I got nice, virgin-clear fluid at each one. One of the ABS bleeder valves sputtered a little before giving me a solid stream of fluid. Pedal height is improved. Performed my usual after-brake-job test drive to burnish the new pads. Three hard "slows" from 40 mph to 10--15 mph, then several hard "slows" from 70 mph to 40 mph. At that point, the pads seemed nicely bedded; the car didn't shift side-to-side any more when slowing; and the pedal effort for a hard stop reduced considerably. Nice and predictable. I also began to smell the brakes a little. I continued at highway speed for a couple miles, then slowed hard from 90 to 40. Powerful, sure, stable. Good to go! I don't allow the wheels to "stop" when bedding brake frictions--finned drums and vented rotors are centrifugal air pumps; and I want as much cooling air flow as practical--especially when braking from high speed. Going from 90 to 0, and allowing the brakes to roast with no air flow is brutal--keep the speed up if possible so the air flow carries the heat away. Of course, if traffic conditions require a full stop, that's what you do--but don't hold heavy pressure on the brake pedal while stopped. Release as much pressure as possible while keeping the vehicle stationary. This reduces the heat put into the pads, and therefore the heat put into the calipers and fluid. And the pads/shoes don't "weld" to the rotors/drums. The rotors and drums are designed to get hot; ideally the pads or shoes, calipers, rubber seals, and fluid should be kept cool if practical.
 1 point
 -
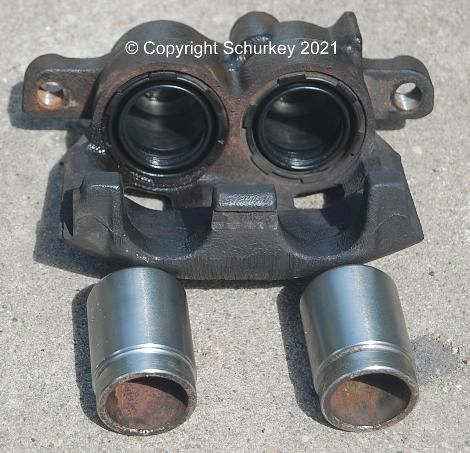
Composite brake rotors.
cessna reacted to Schurkey for a topic
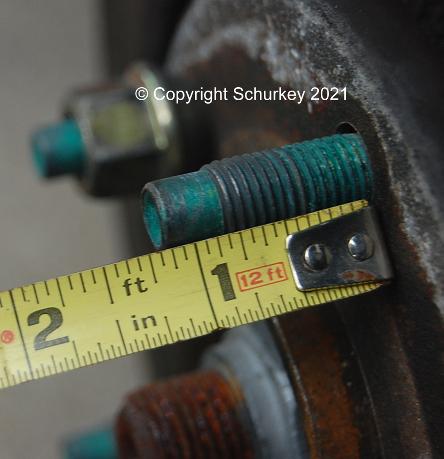
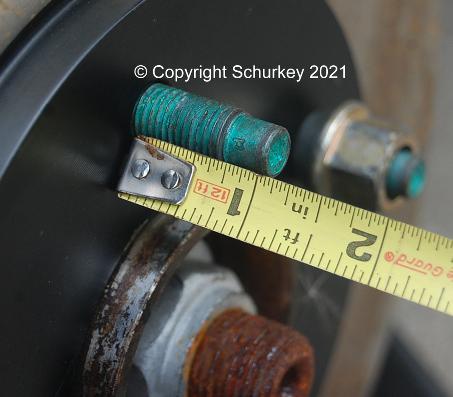
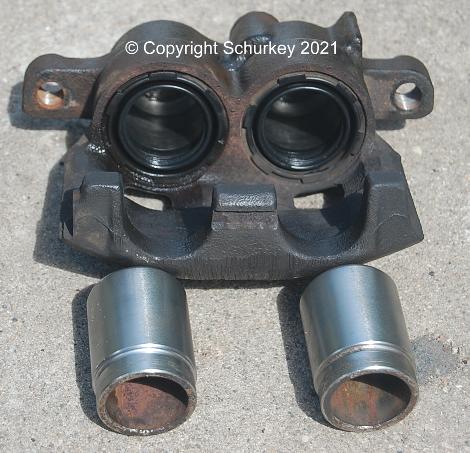
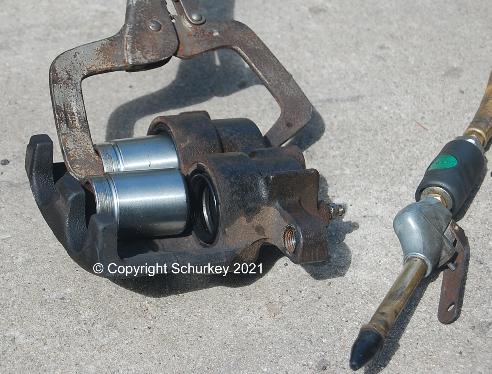
Needed a "surprise" front brake job on my '98 Monte Carlo. Ordered my usual pads, (Made in USA Performance Friction "Carbon Metallic" 0376.20) and found some "Genuine GM Original Equipment" 177-0972 brake rotors on Amazon. The rotors came in GM-looking boxes (one box opened, rotor had very light surface rust, one box still sealed with the rotor in a sealed plastic bag inside.) The new "original equipment" rotors were Made in China. Bummer. They're also full-cast which didn't bother me any, nor do I consider it an upgrade any more, which I once did. The old rotors were on my driveway overnight, it rained, they rusted. The braking surface wasn't rusty in-use, but the rest of the rotor was, as is usual. The stamped-steel center vs. the cast-iron center is visible in the next photo. I also took pictures of the lug studs with the all-cast rotor and the composite rotor: First up, composite About an inch and an eighth of stud sticking out, compared to about one inch for the all-cast rotor. Looking at the lug nuts in the background, you can see that the composite rotor has about an eighth of an inch more protrusion than the all-cast rotor. I have no idea how that eighth-inch can cause problems. Of course, I wire-brushed the hub flange and around the lug-studs to remove loose rust before sliding the new rotors over the lug studs. As is my proclivity, I also pulled the calipers apart for cleaning and inspection. The most-contaminated brake fluid in a brake system is usually in the lowest point--the calipers or wheel cylinders. I was concerned that the driver's side caliper might be sticky, as the pad was down to the rivets while the passenger side still had some life left in 'em. In fact, the calipers looked fairly good inside, and slid easily on the pins. God bless iron calipers! I did this same job on my Trailblazer (Aluminum calipers) and the aluminum calipers tend to corrode behind the square-cut seal, leading to seized or at least stiff-moving pistons. The iron calipers were beautiful inside, and the pistons were pristine behind the outer dust-seal. The pistons were ugly on the part that sticks out of the dust seal, but that cleaned-up nicely on a wire wheel. The part that sticks out doesn't really matter, but anything that would slide on the square-cut seal has to be perfect--no pitting, no flaking chrome. I pulled the square-cut seals out for inspection and cleaning. Sometimes the square-cut seals develop a hard "crust" from deposits in the caliper. That crust would have to be peeled off with a fingernail. These calipers didn't have any of that. The seals were nice. The dust seals are pressed into the caliper; they've got a metal reinforcement molded into the rubber. I left them alone--removing them would likely wreck the metal reinforcement or tear the rubber. I sprayed the bores with Brakleen, and wiped 'em out with paper towels. Then lube the seals with clean brake fluid before reinstalling, and lube the pistons before trying to cram the pistons back in. Just like any other multi-piston caliper, it's a pain in the ass to get both pistons out, and worse getting them back in again. Compressed air will usually blow the pistons out, (put a piece of wood against the piston, so it doesn't bang into the iron of the caliper when it pops out) but one pops free before the other--and then you've got a big hole in the caliper so you can't build pressure to force the second piston out. One piston has to be stuffed partially in-place to sort-of seal the hole, while using compressed air to remove the second piston, or to inflate the dust seal over the other piston during re-assembly. Then you have to secure the partially-installed piston so it doesn't blow back out when you try to inflate the dust boot over the other piston. I found that my C-clamp vice grip was not shaped properly for these pistons. I needed to drop a pair of 3/4 steel nuts into the pistons so the vice grip would press on the bottom instead of the side of the vice-grip pushing on the top rim of the piston. This photo shows one piston held in place to prevent air leakage, just before inflating the boot over the closer piston. Wear leather gloves, the piston will get pushed away from the bore as the boot inflates, and your fingers will get kinda pinched against the outer edge of the caliper. It's not bad, but gloves help some. Once the pistons are started in the bores (with the bottom edge past the square-cut seal) they ought to press the rest of the way down with hand pressure. I lube the pins with brake caliper grease, and I apply anti-seize to the threads of the various fasteners EXCEPT the banjo bolt for the brake hose. I've had exceptional luck re-using all rubber seals, copper washers, etc. These parts are not always re-usable, check them carefully for signs of wear, cracking of rubber, etc. Time to quit typing, and flush the brake fluid, then put the wheels back on...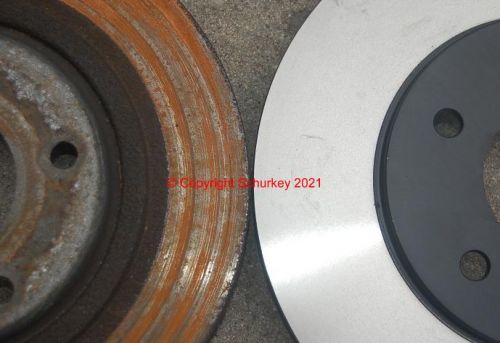


 1 point