All Activity
- Today
-
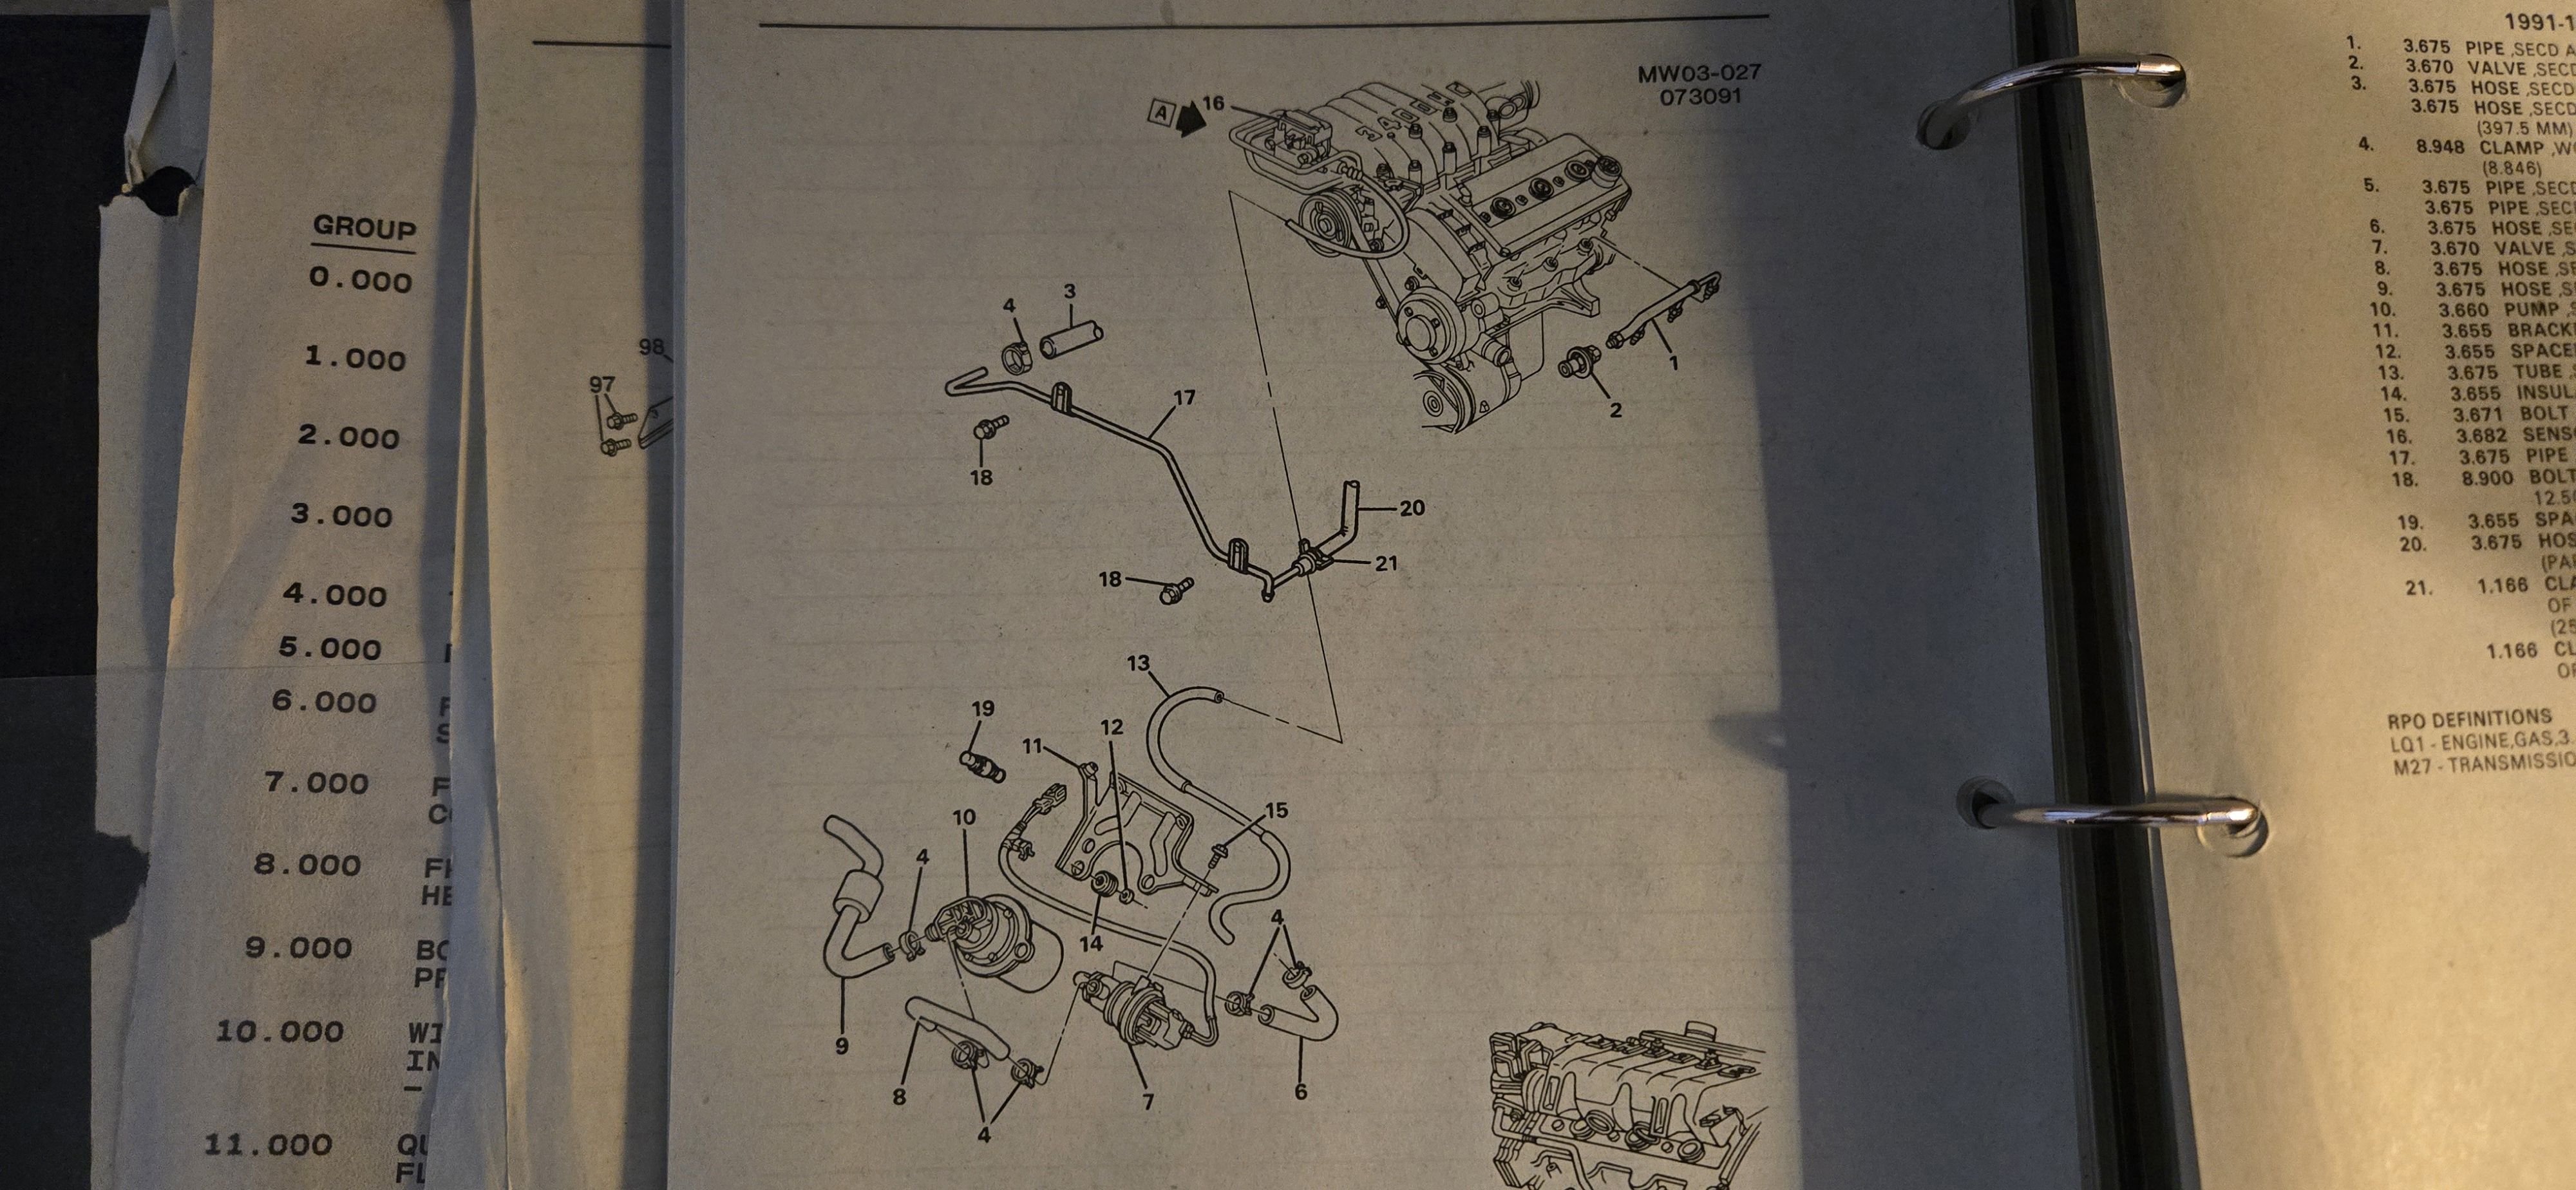
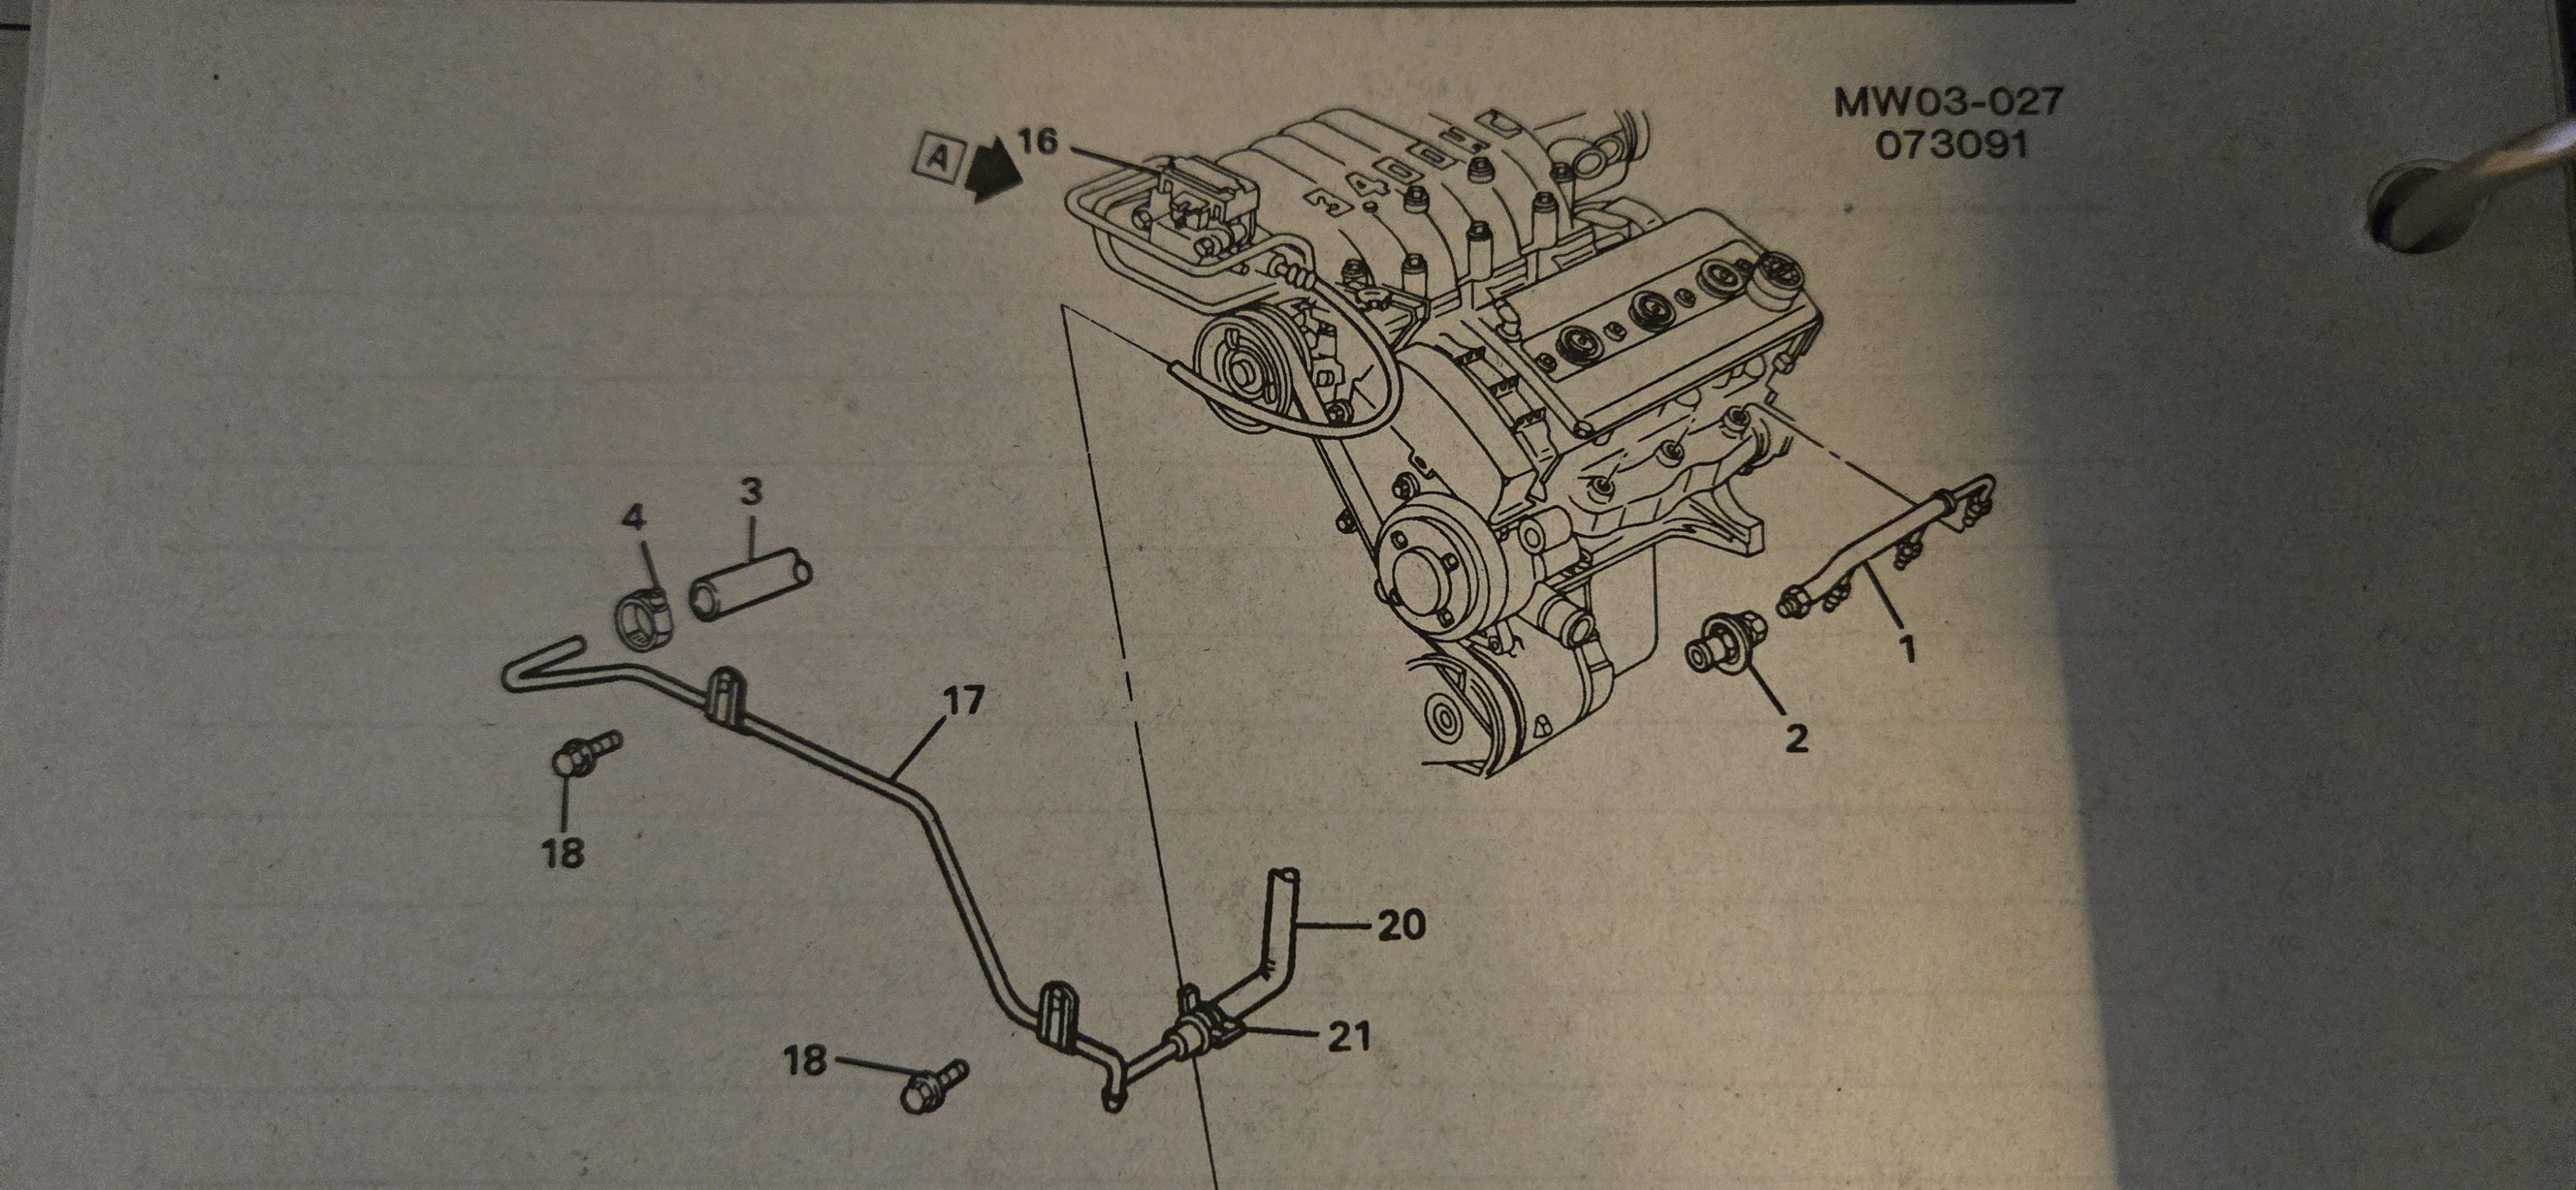
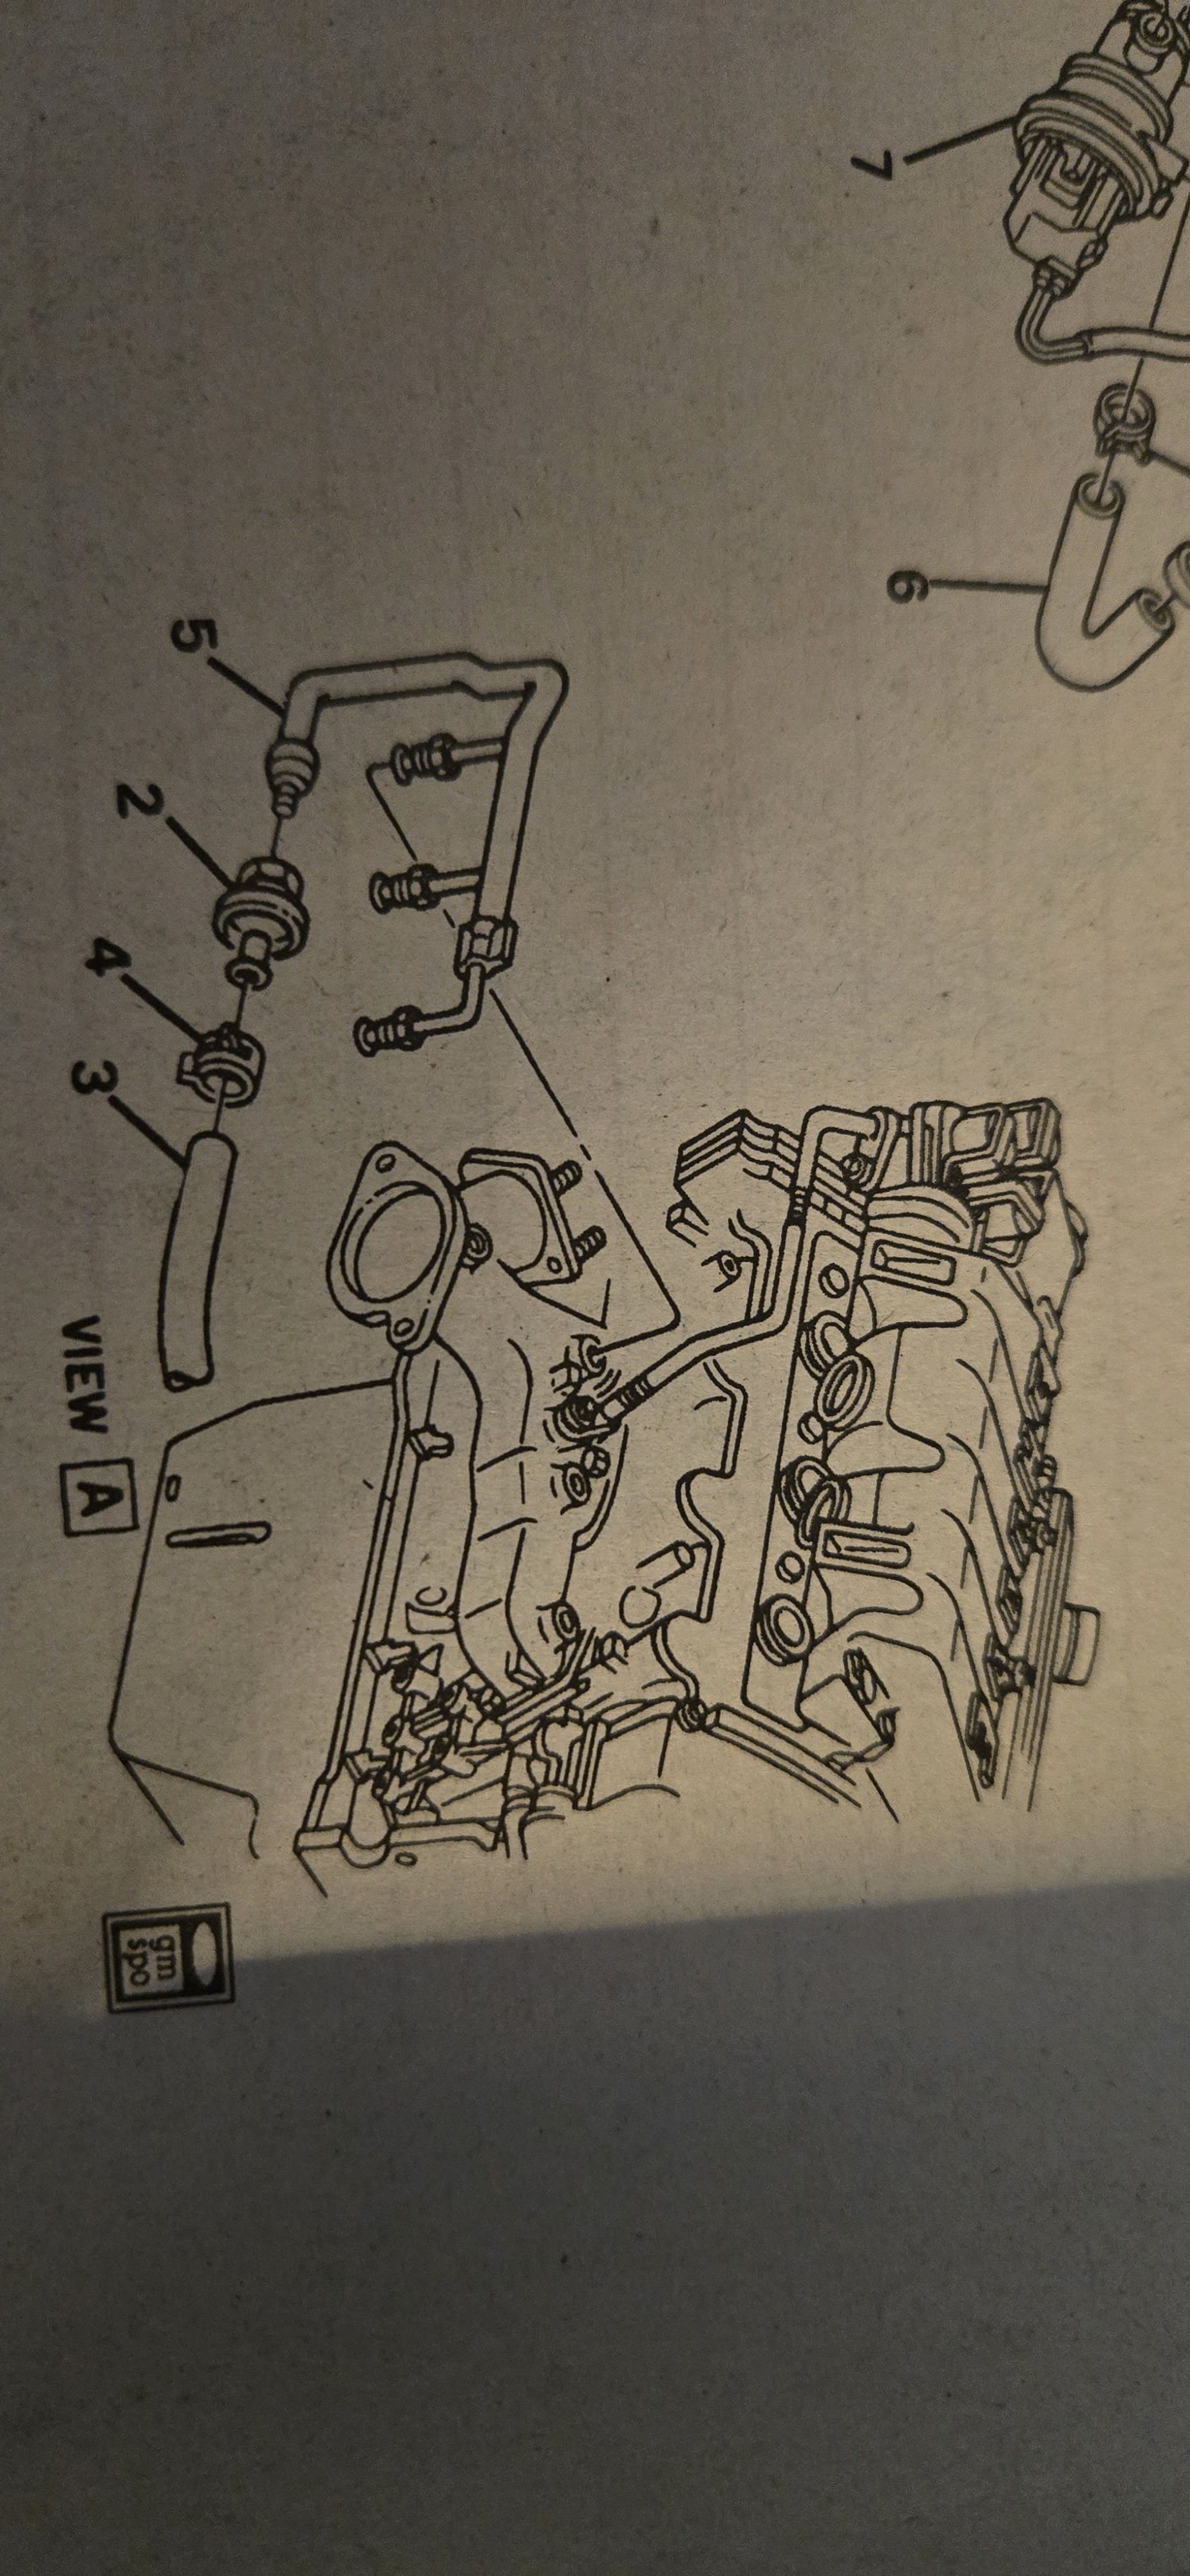
Interesting... didn't the manual show three ports on the exhaust manifold, and this shows just one? The plug wires come up from below there on 91-93, whereas it was relocated to the upper left in later years. That pipe probably wouldn't work due to interference with the plug wire routing.
-
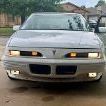
'92 GTP 3.4 5-spd - Right Front Part Identification
jiggity76 replied to crazyd's topic in Powertrain
You're welcome. Something to investigate...these are 96 LQ1's. This is from a random Google search of 2 - 96 Monte Carlo Z34's. Looks like they have that same silver pipe on the front headers. Since we know the last year for the manual LQ1 was 92/93...and these are obviously automatic cars, maybe the same or very similar setup was standard on all 96-97 LQ1's by then. If so, this will help with the availability of possible parts prospects. -
Awesome, thanks guys. Looks like I don't have the proper manifold to connect that pipe even if I had it. PO must have swapped it out.
-
'92 GTP 3.4 5-spd - Right Front Part Identification
White93z34 replied to crazyd's topic in Powertrain
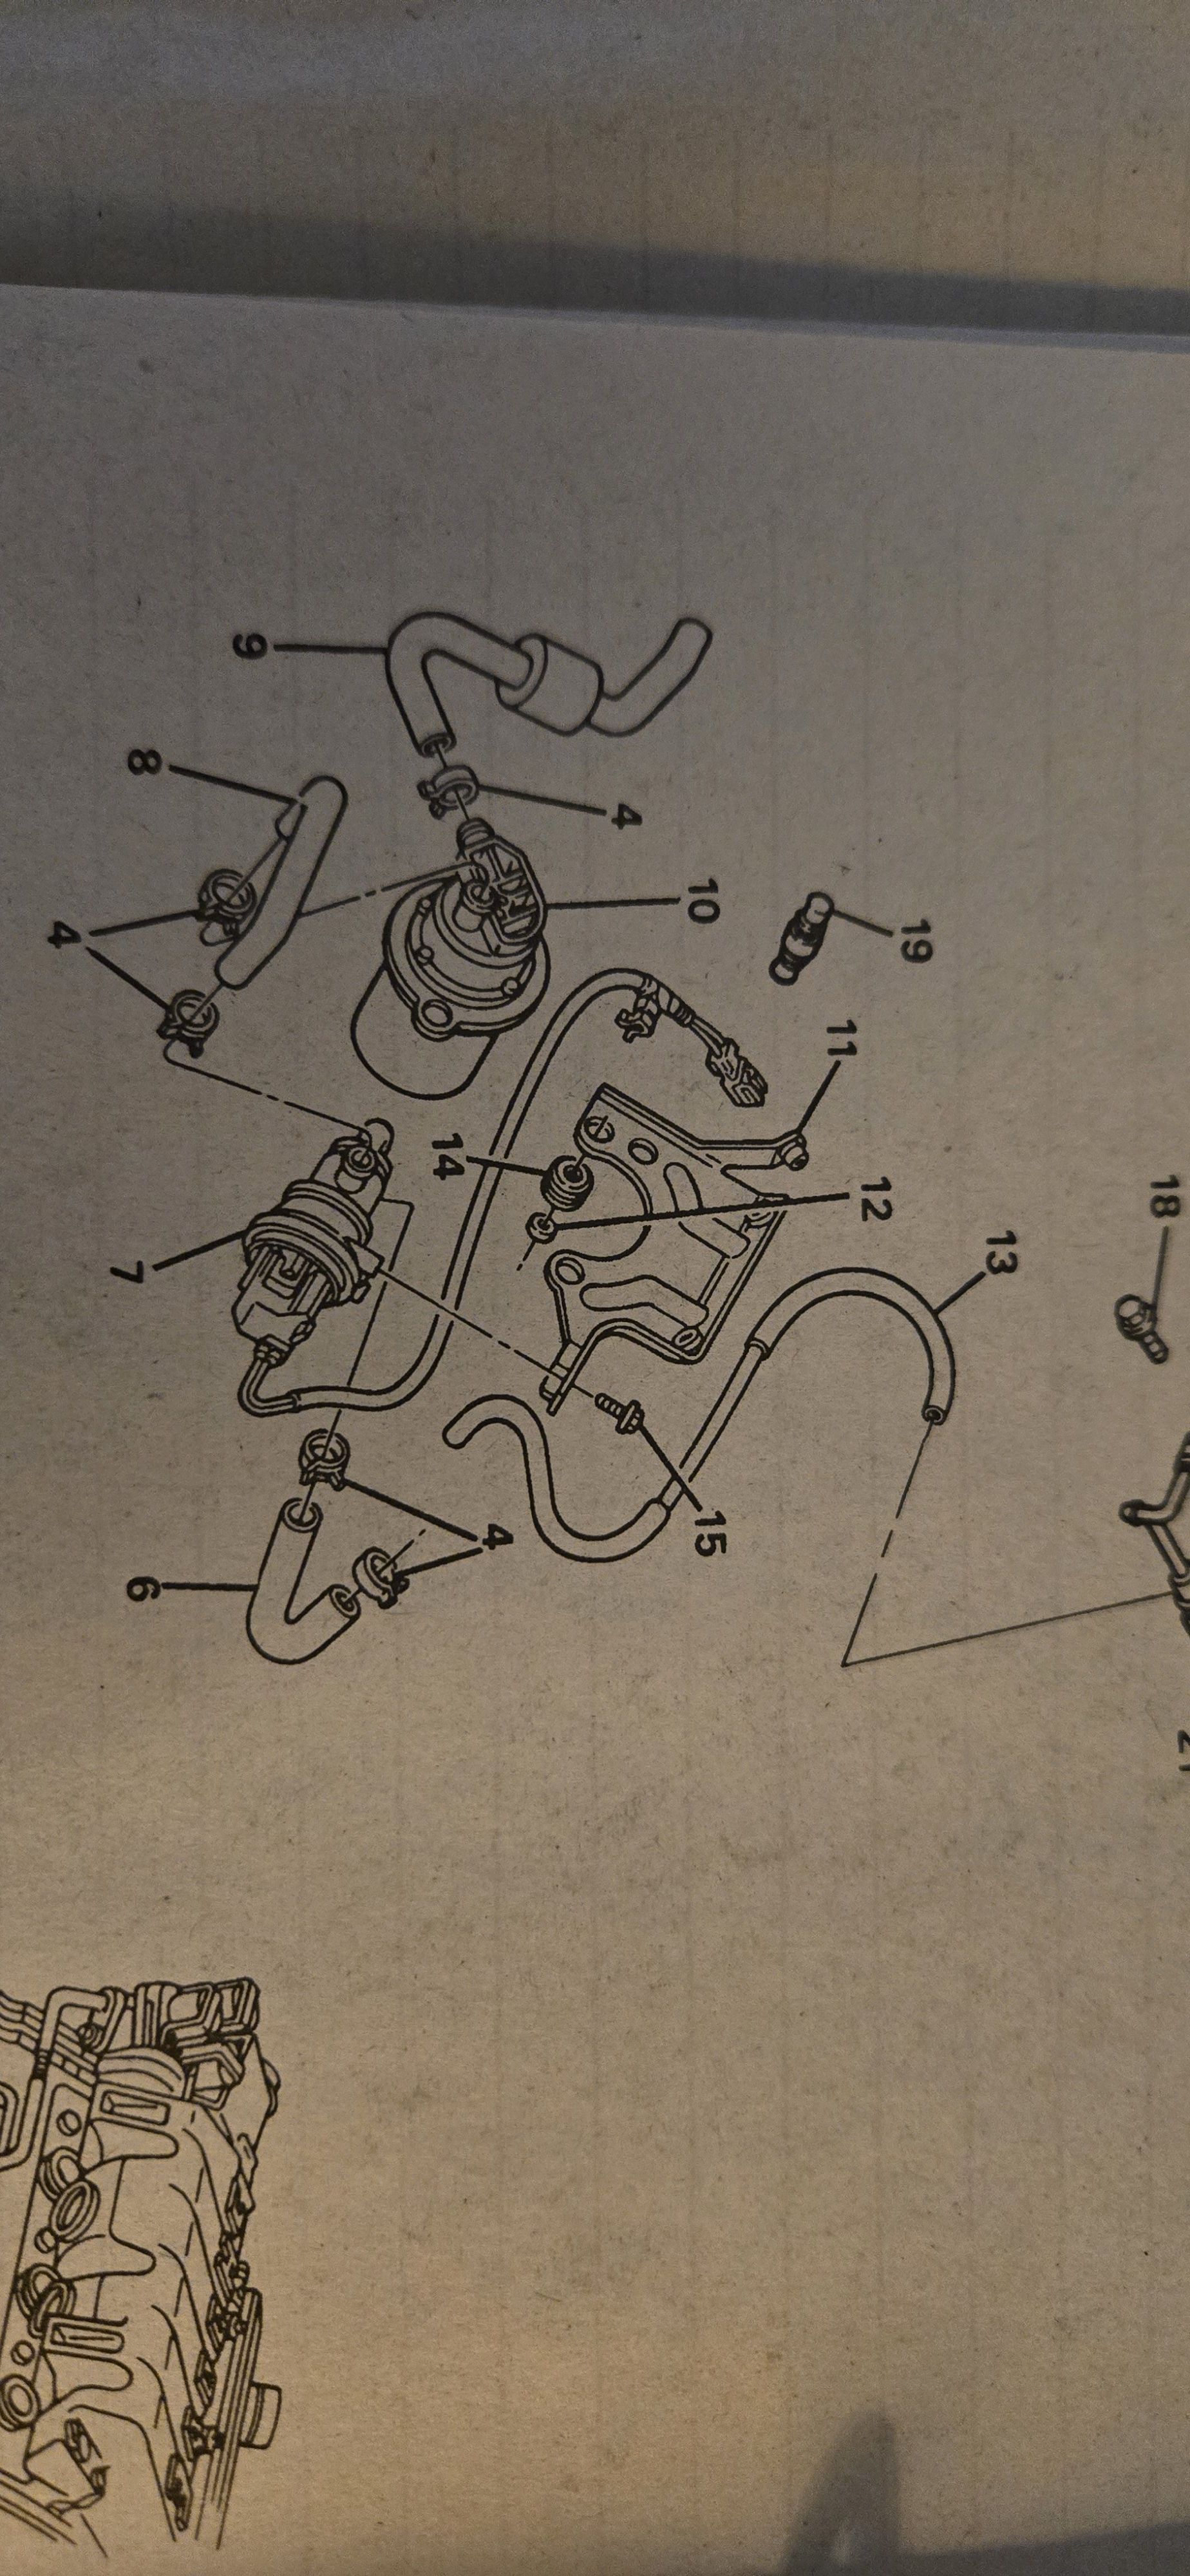
its LQ1 5 speed only. Pipes 3, 20 connect to the exhaust manifold Pipe 17 connects to pipe 9 and the air pump, part 10 -
'92 GTP 3.4 5-spd - Right Front Part Identification
jiggity76 replied to crazyd's topic in Powertrain
-
'92 GTP 3.4 5-spd - Right Front Part Identification
jiggity76 replied to crazyd's topic in Powertrain
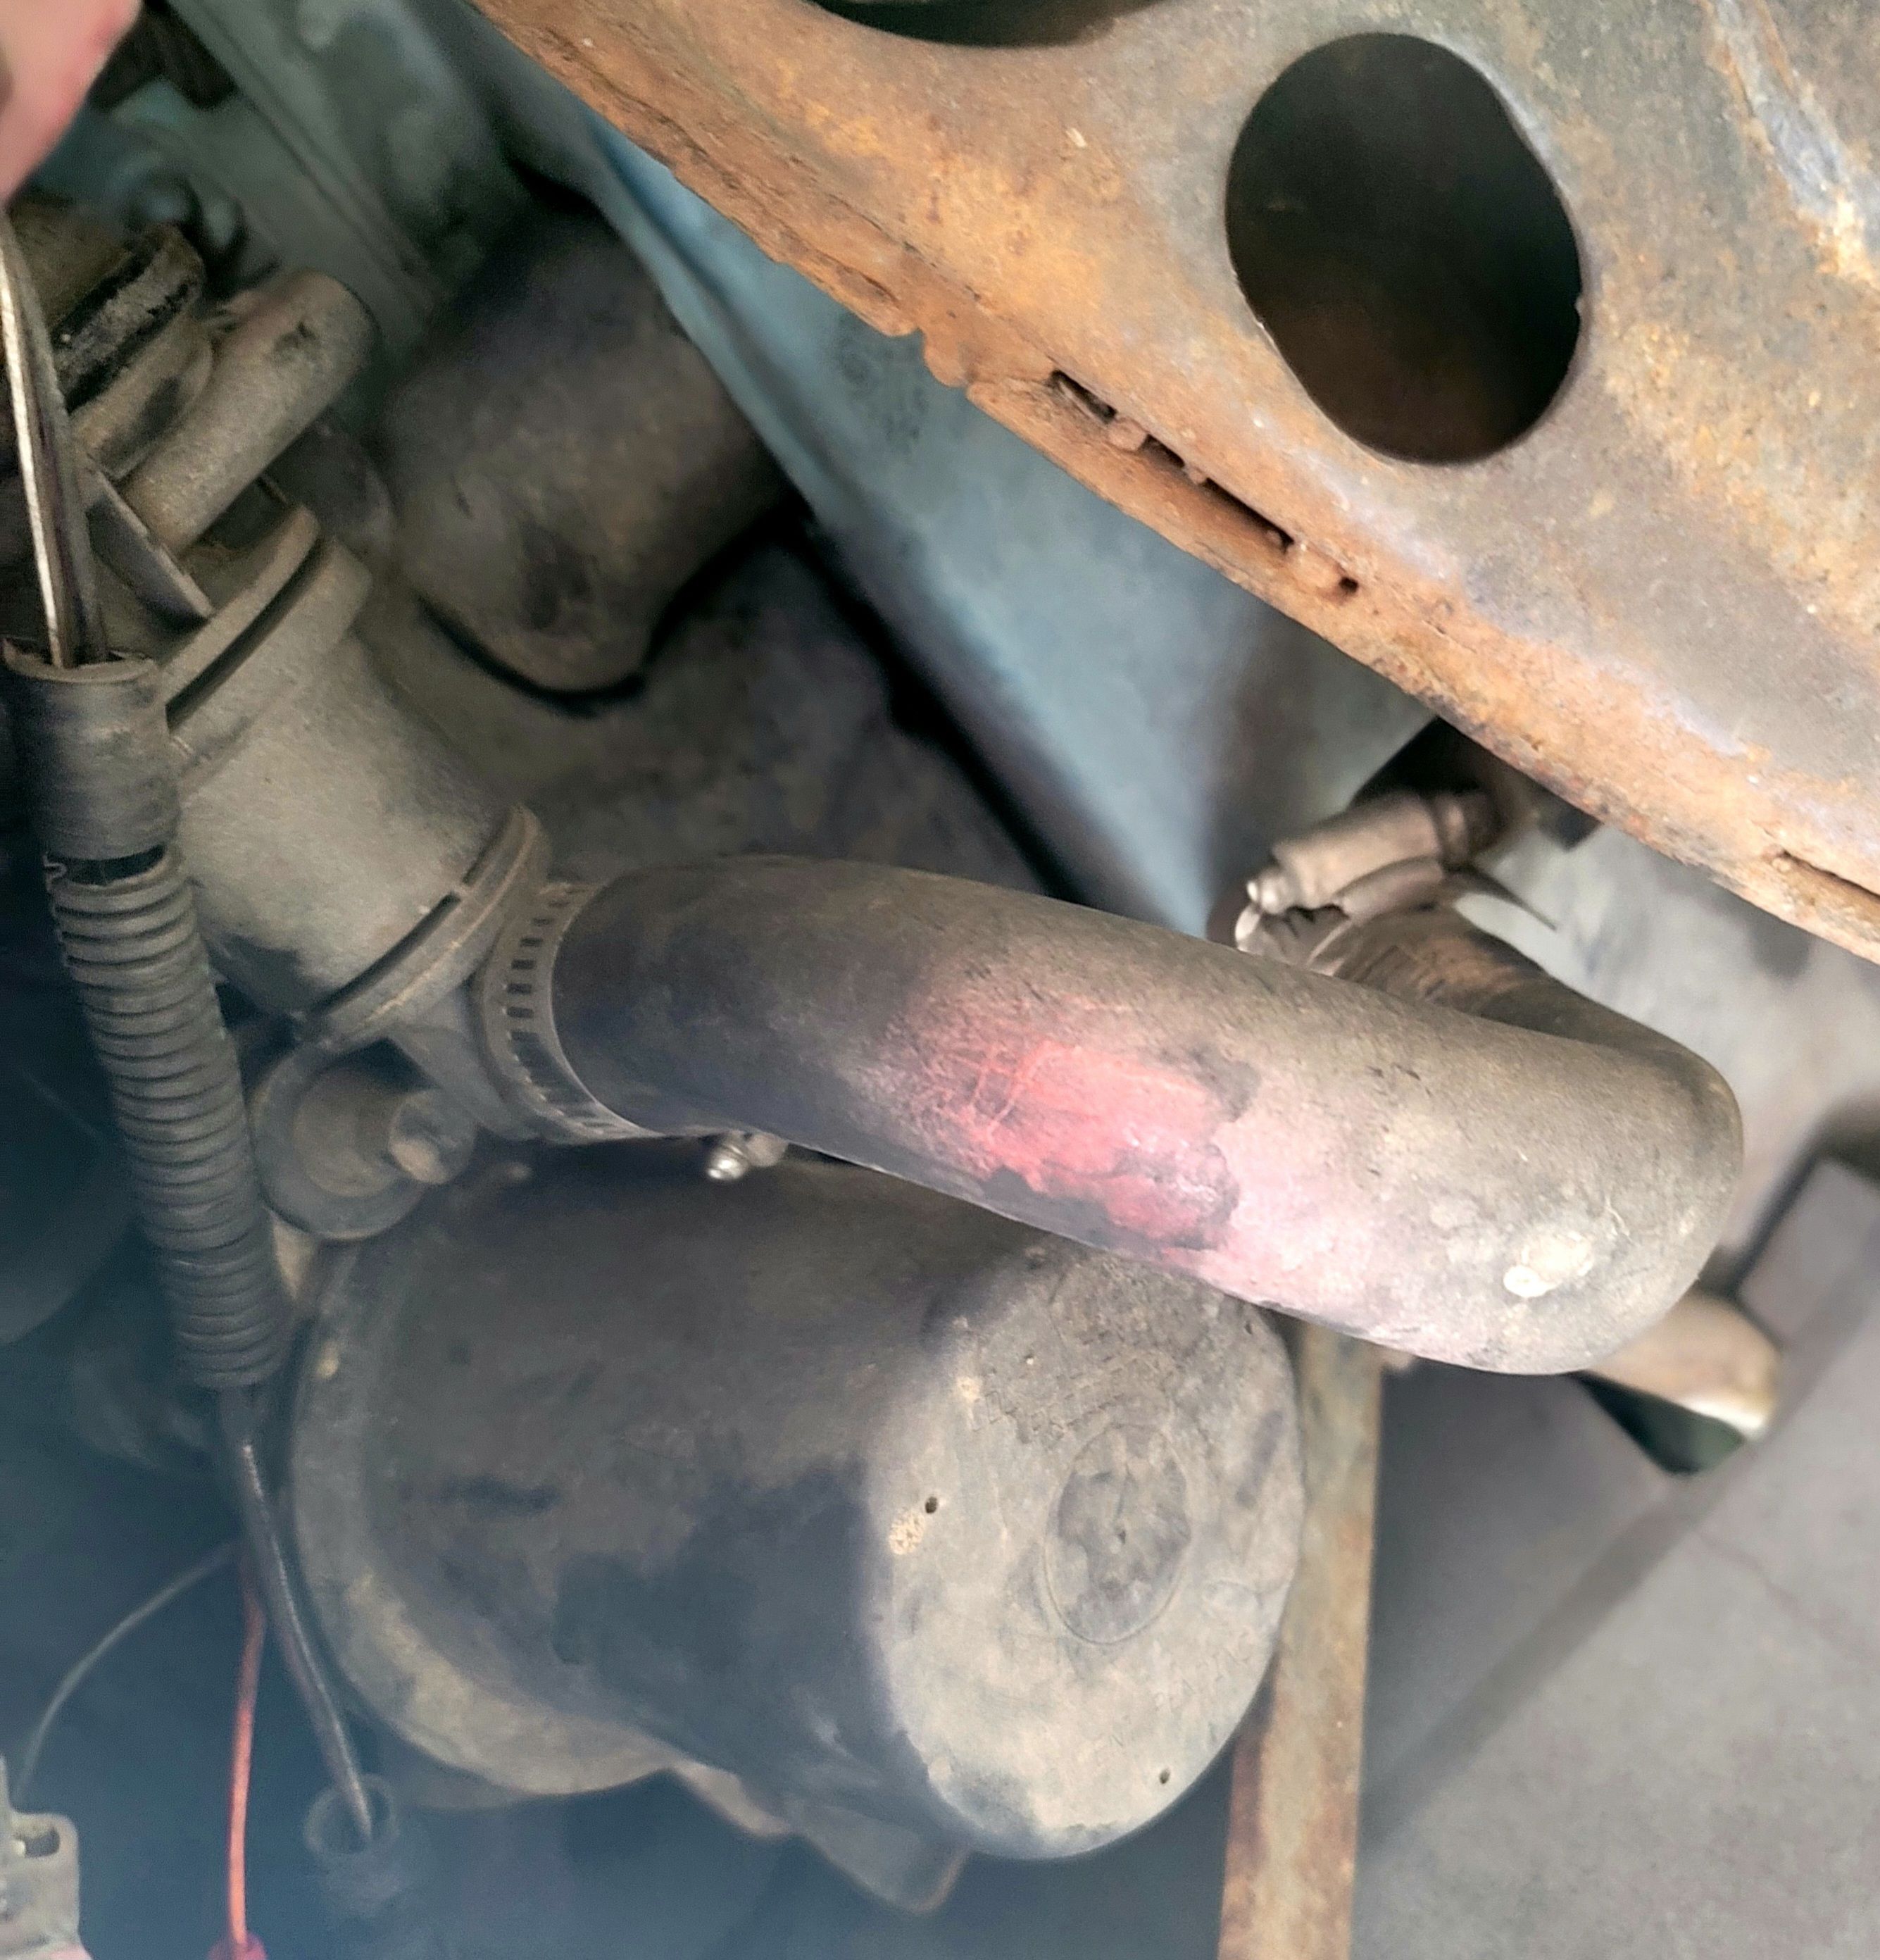
I'm just guessing here but it looks like there is 2 points of entry? One...the area where the system goes into the front header. The second one...up topside where that hose goes into the sensor thingy on the end of the plenum. -
'92 GTP 3.4 5-spd - Right Front Part Identification
jiggity76 replied to crazyd's topic in Powertrain
-
Depending on the design of the headlights, they may have bearing assemblies that allow for aiming or movement (like in some vehicles with adjustable headlight beams). Make sure those bearings are in good condition when swapping. If the bearings that control the adjustment mechanism are damaged or worn out in the GP lights, you could either replace them or move the intact bearings from your old CS lights if compatible.
-
I've been working on this for the last four days, and it took over 120 cycles (what the manual says could be "several" but I lost count) of back-and-forth rotation to get it to where there were no more air bubbles and the pump was finally quiet again. Determined to fix this once and for all, I had gotten an OEM pump off a junkyard Z34 and installed it, then proceeded with the bleeding procedure in cycles of 10 at a time. I've replaced the pump at least three times before over the years, and have tried the cold-weather fluid as well. Nothing has ever worked and most things just made it worse, because the problem all along has been pump cavitation from air in the system that I never knew the right way to bleed it out.
-
I know what this is and what it does. On my C5, it is called an Air Injection Reaction pump, and it pumps fresh air into the exhaust at startup to accelerate lighting off the catalytic converter, like blowing on a fire to get it burning, to reduce startup emissions. I don't know if this is specific to manuals or the 3.4 or even 91-93s, but I can't find any information about it in the 1992 factory service manual. If your car has one of these, where does the pump's outlet hose connect where it comes into the engine bay near the AC compressor?
- Last week
-
In the GP it's mounted to the topside of the right rear parcel shelf next to the speaker.
-
Appreciate the response. I’ll see what I can do this weekend.
-

Power steering whine
Schurkey replied to 06goat75's topic in Brakes/Suspension/Steering/Wheels/Tires
My '03 Trailblazer needed the GM/ACDelco "Cold Climate" PS fluid. Whined like a 2-year-old with regular PS fluid. I don't know of any other vehicles that have needed the Cold Climate fluid...but it's available if that's what it takes. -
 Elvira joined the community
 -
So I know it has been a while, but in case this is still a problem for anyone and for future reference, I found that I have been doing the bleeding procedure incorrectly - and most of the YouTube instructional videos are too. I found the proper procedure in the FSM and I'm posting it here. BLEEDING THE POWER STEERING SYSTEM After replacing the fluid or servicing the power steering hydraulic system, you must bleed air from the system. Air in the system prevents an accurate fluid level reading, causes pump cavitation noise and over time could damage the pump. To bleed the power steering system, proceed as follows: 1. Begin with the engine off, front wheels off the ground. and wheels turned all the way to the left. 2. Add either standard power steering fluid or optional cold climate fluid, to the "FULL COLD" mark on the fluid level indicator. Refer to MAINTENANCE AND LUBRICATION (SECTION OB) for information on power steering fluids. 3. Bleed the system by turning the wheels side to side without hitting the stops. ! Important This may require turning the wheels from side to side several times. Keep the fluid level at the "FULL COLD" mark. Fluid with air in it has a light tan appearance. This air must be eliminated from the fluid before normal steering action can be obtained. Start the engine. With the engine idling, recheck the fluid level. If necessary, add fluid to bring the level to the "FULL COLD" mark. 5. Return the wheels to the center position. Lower front wheels to the ground. Continue running the engine for two or three minutes. 6. Test the vehicle to be sure the steering functions normally and is free from noise. ! Important Inspect for fluid leakage at connection points along the power steering system. 7. Recheck the fluid level as described in Steps 3 and 4 except that the fluid level should now be up to the "FULL HOT" mark after the system has stabilized at its normal operating temperature.
-
I could be wrong this was a long time ago. In my 1991 Grand prix my keyless entry did not work at all. Figured out the relay was getting power but not doing anything. If I recall it is under the rear package tray? I remember getting in the trunk at one point, but that could have been my convertible. I did also remove my rear interior panels, but can't remember if it was for the keyless entry module. Once you find it, just open it up and look for bad solder joints and touch them up. That's how I fixed mine.
-
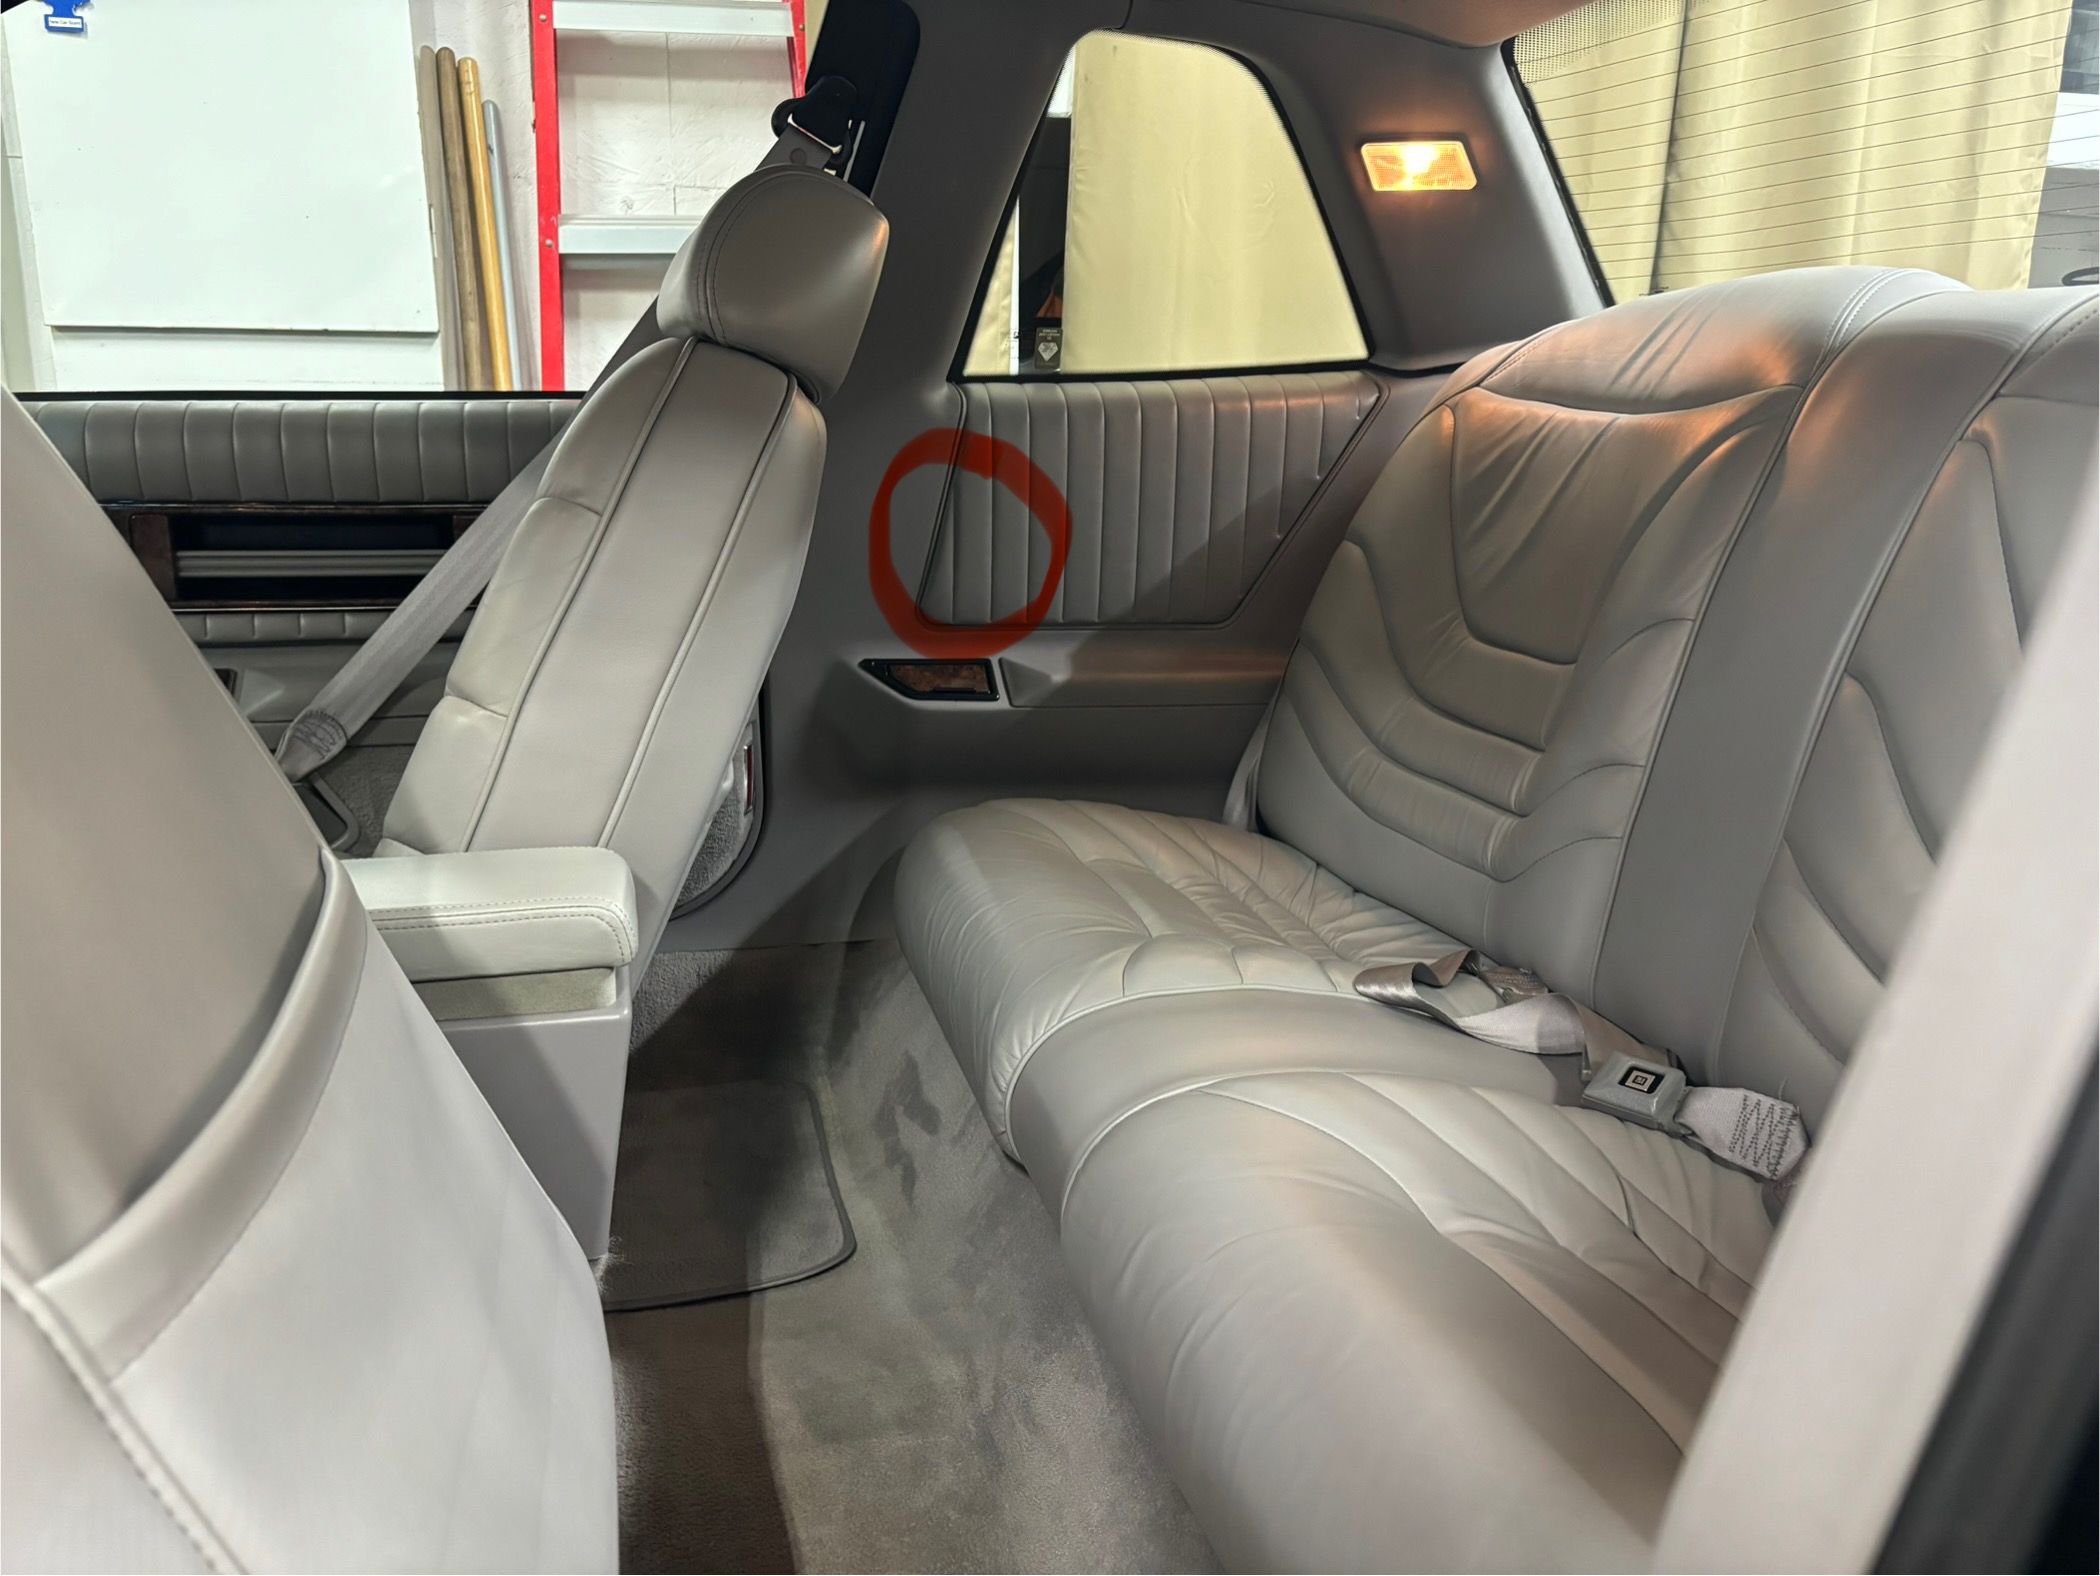
Is it a coupe? In my Regal, it’s behind the passenger side rear interior panel. I believe all of the 1st gen coupes, save for the convertibles have them in a similar location. It’s roughly behind the red circle.
-
Sorry to dig this topic up but I’m currently doing this job off and on on my 1991 Grand Prix. I have unbolted and taken out the back seat completely but haven’t found the module yet. Are they located in the same place on a 91 Grand Prix?
-
When measuring across from clip to clip... All 3 on the coupe are 55" on the money, On the Vert they are all 54 1/2, this will also make the carpet lay funny unless trimmed.
-
Now how about some actual measurements? Did what I could, where I thought I should. Found a few things I will do my best to articulate. Because of the rear seat reinforcement on the Verts... It makes this measurement about 1 1/2 inches shorter when measuring to the very peak of that hump than on the coupe. That will affect the way the carpet lays as well as...
-
I attempted at least 6 videos but I suck at making them. I don't even know what I was trying to say. I`m 100% convinced that the coupe carpet is trimmed into place as it was being installed. The Vert carpet has all the signs around the edge were it was cut with a carpet knife while the coupe carpet has straight edges from the machine that produced it. Vert Coupe I lined them up as best could be using the drivers side pad and a straight edge. Aside from the larger hole for the center console I could not find a difference accept around the edges where it had been cut. The Coupe carpet has nice smooth edges while the Vert carpet is fraying in the places a knife cut it.
-
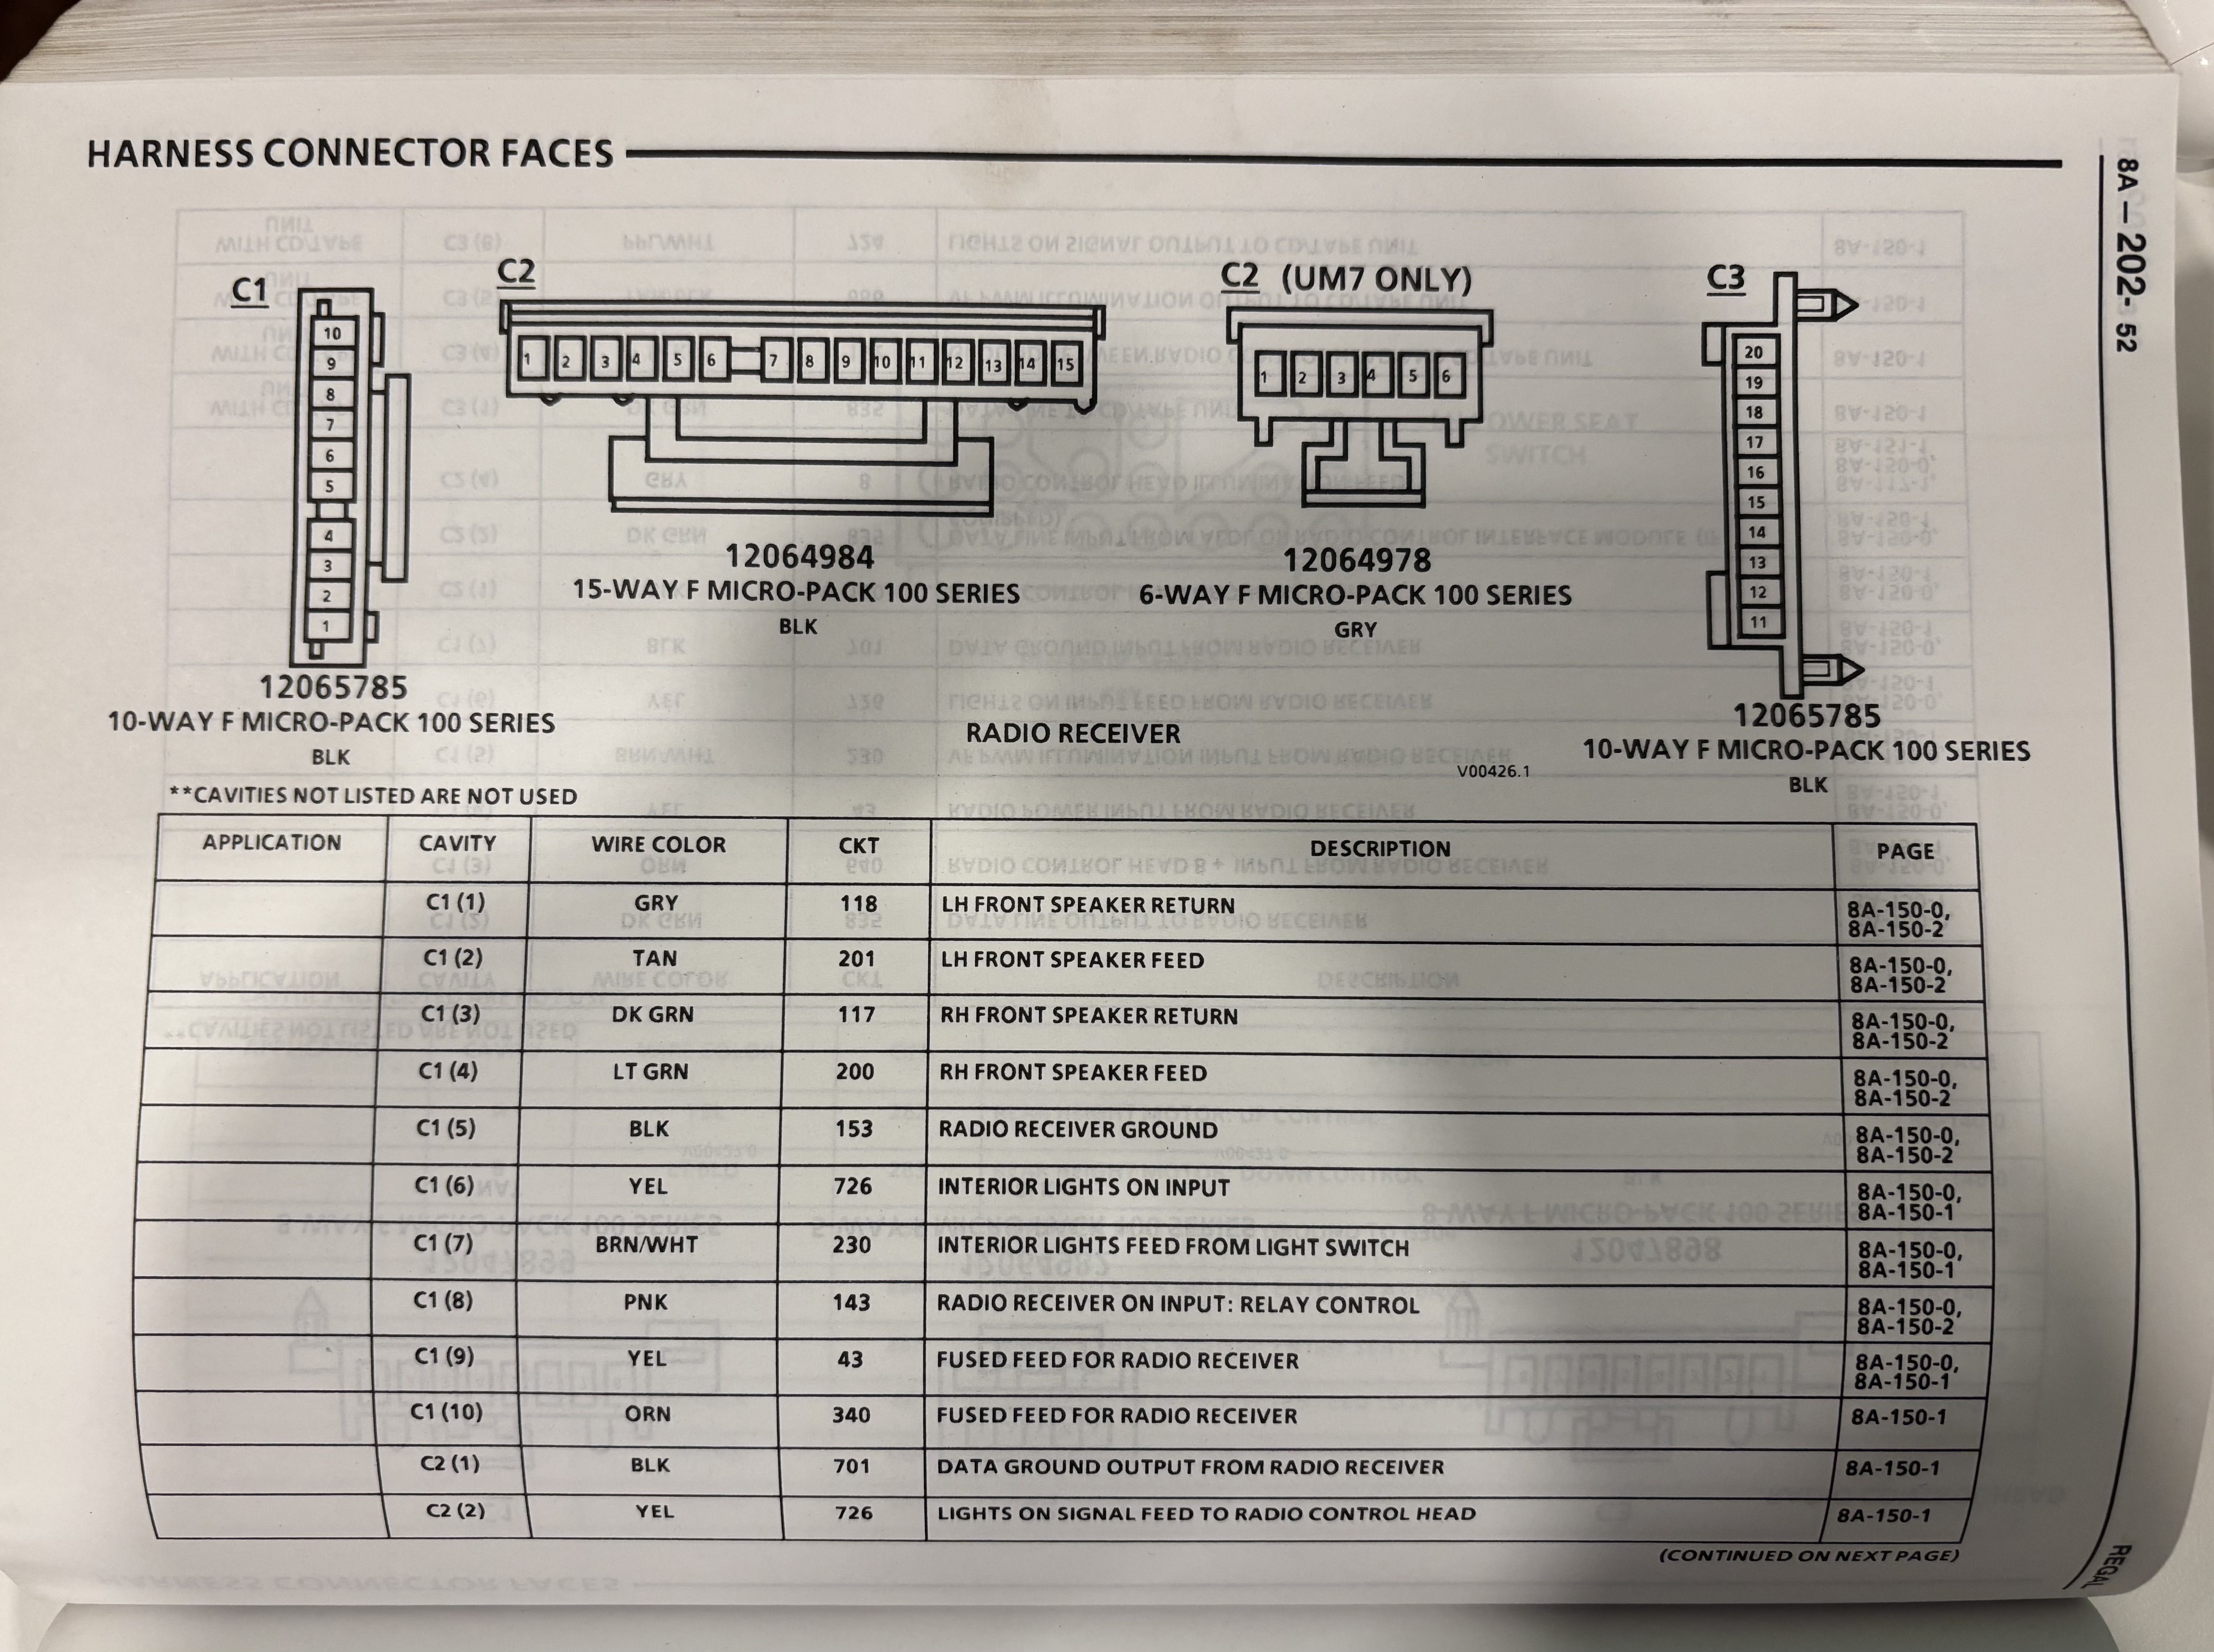
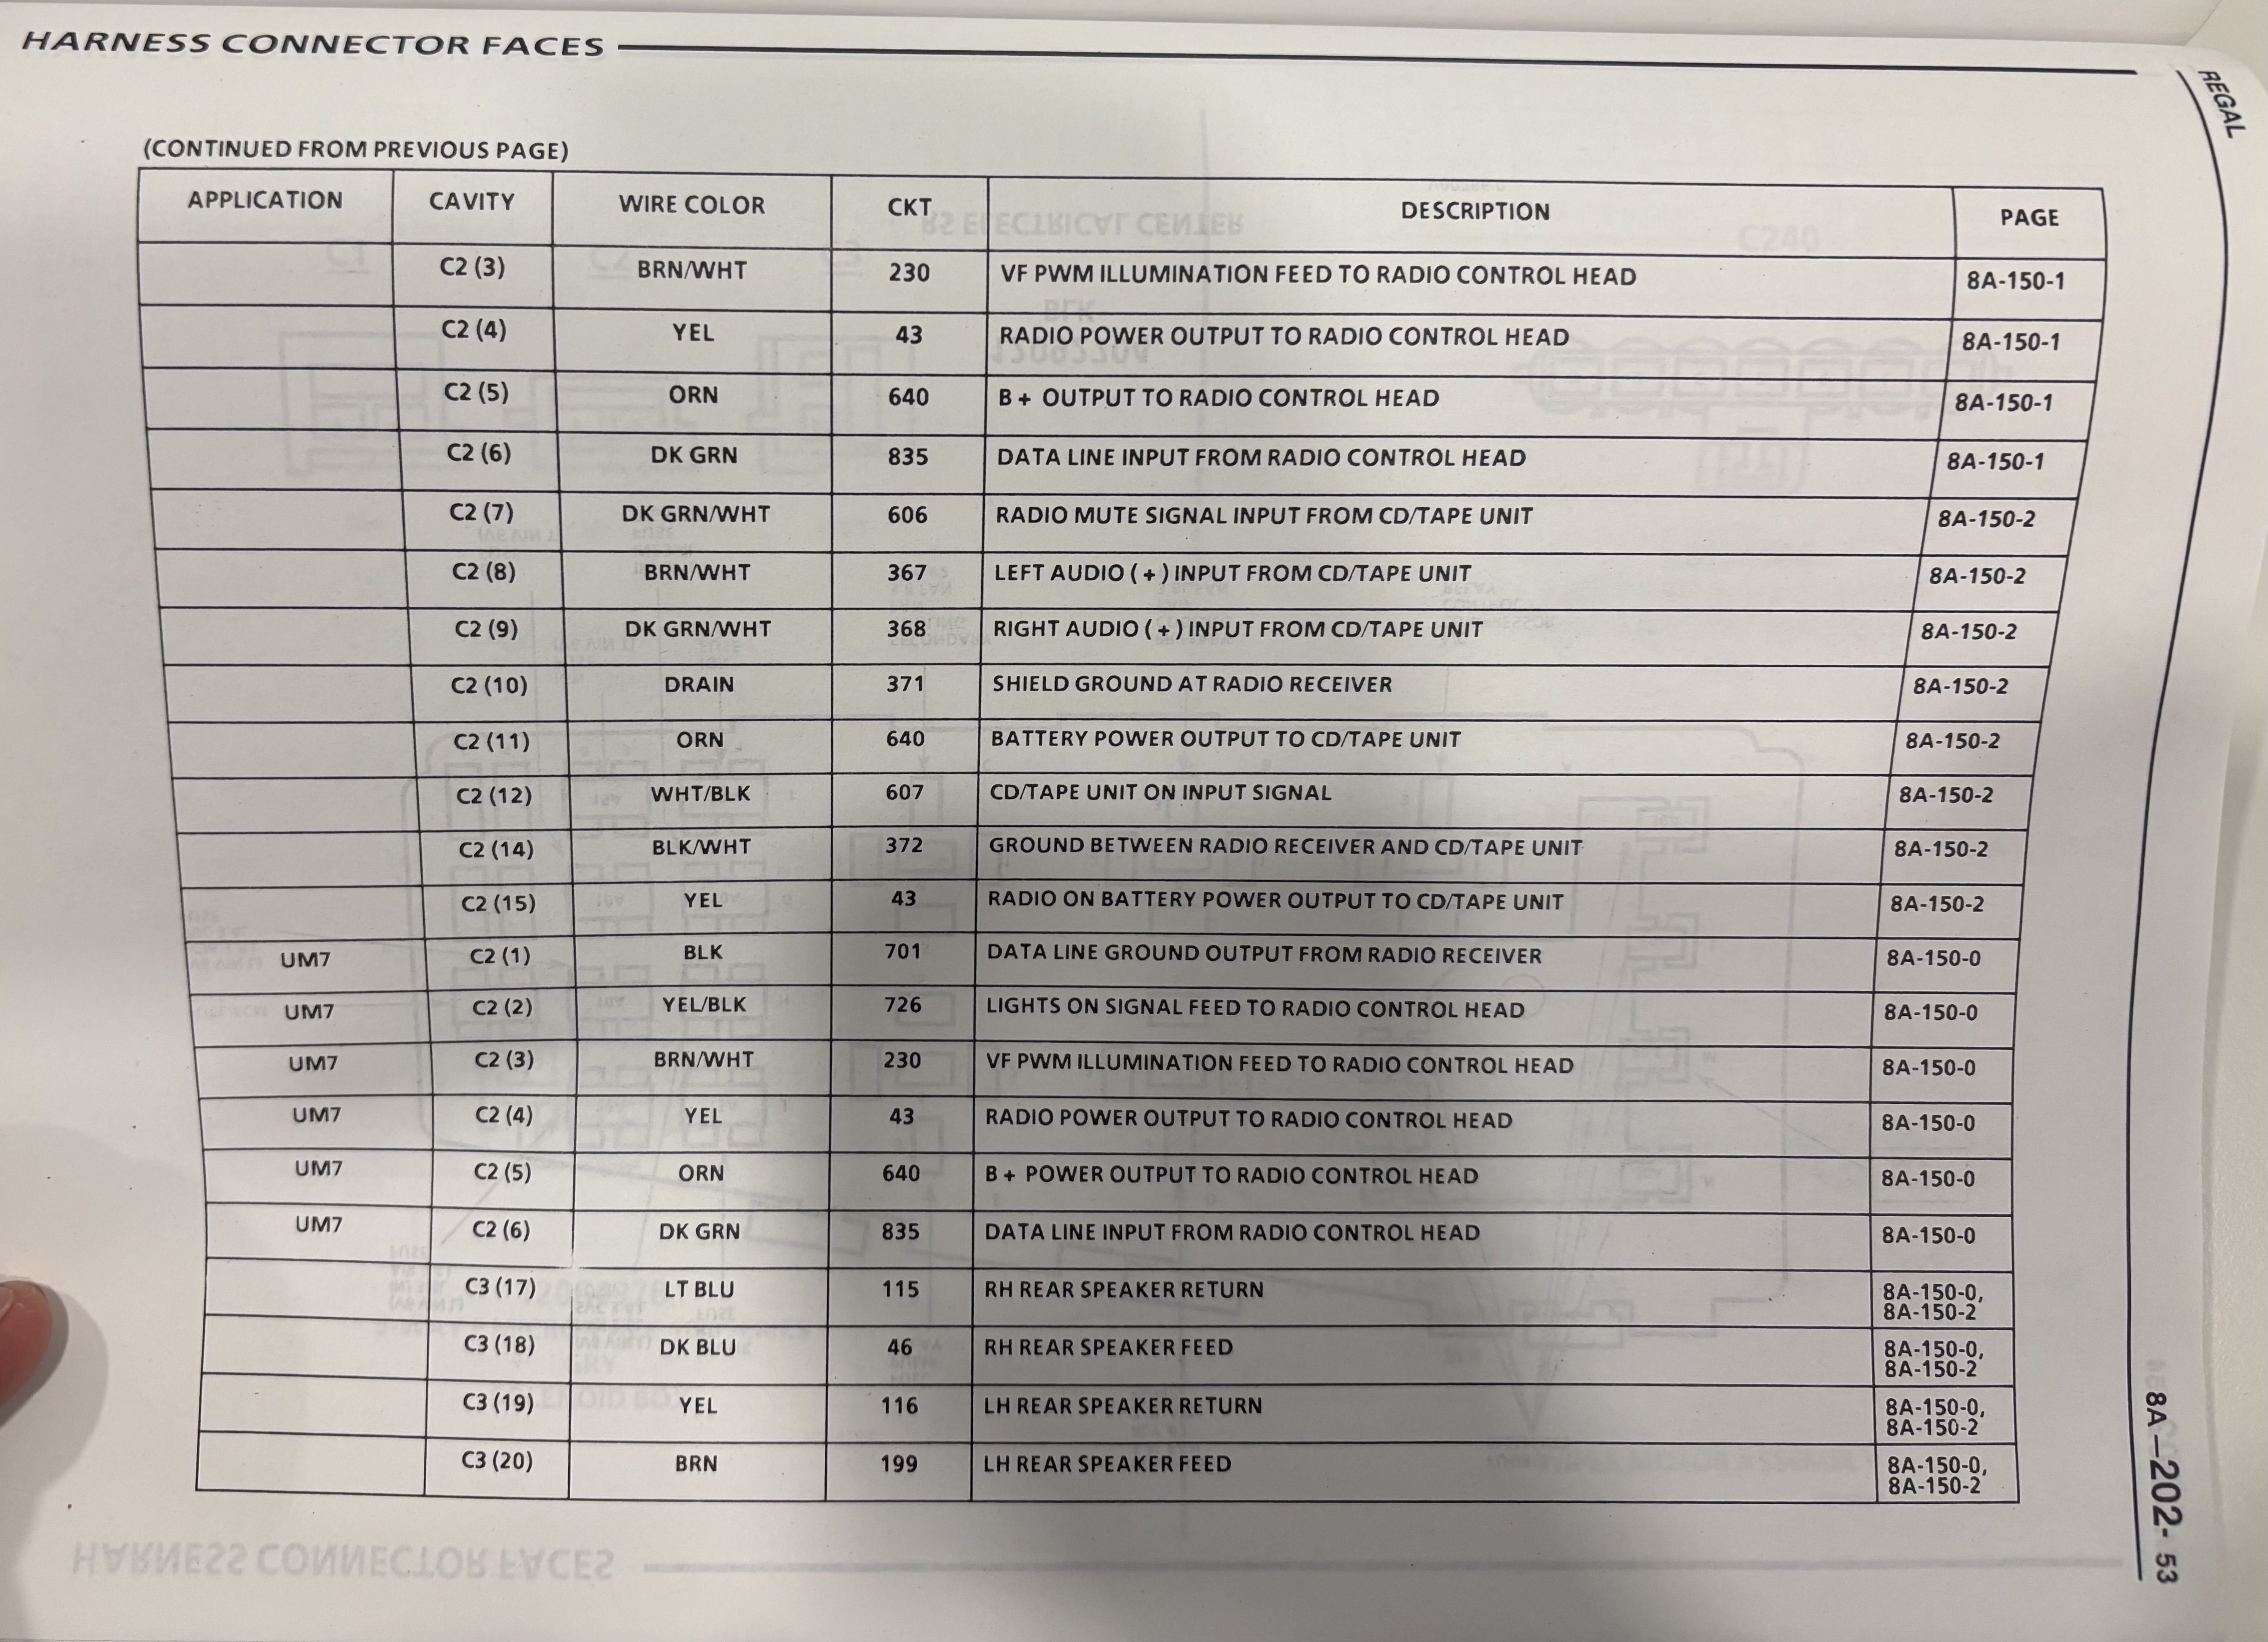
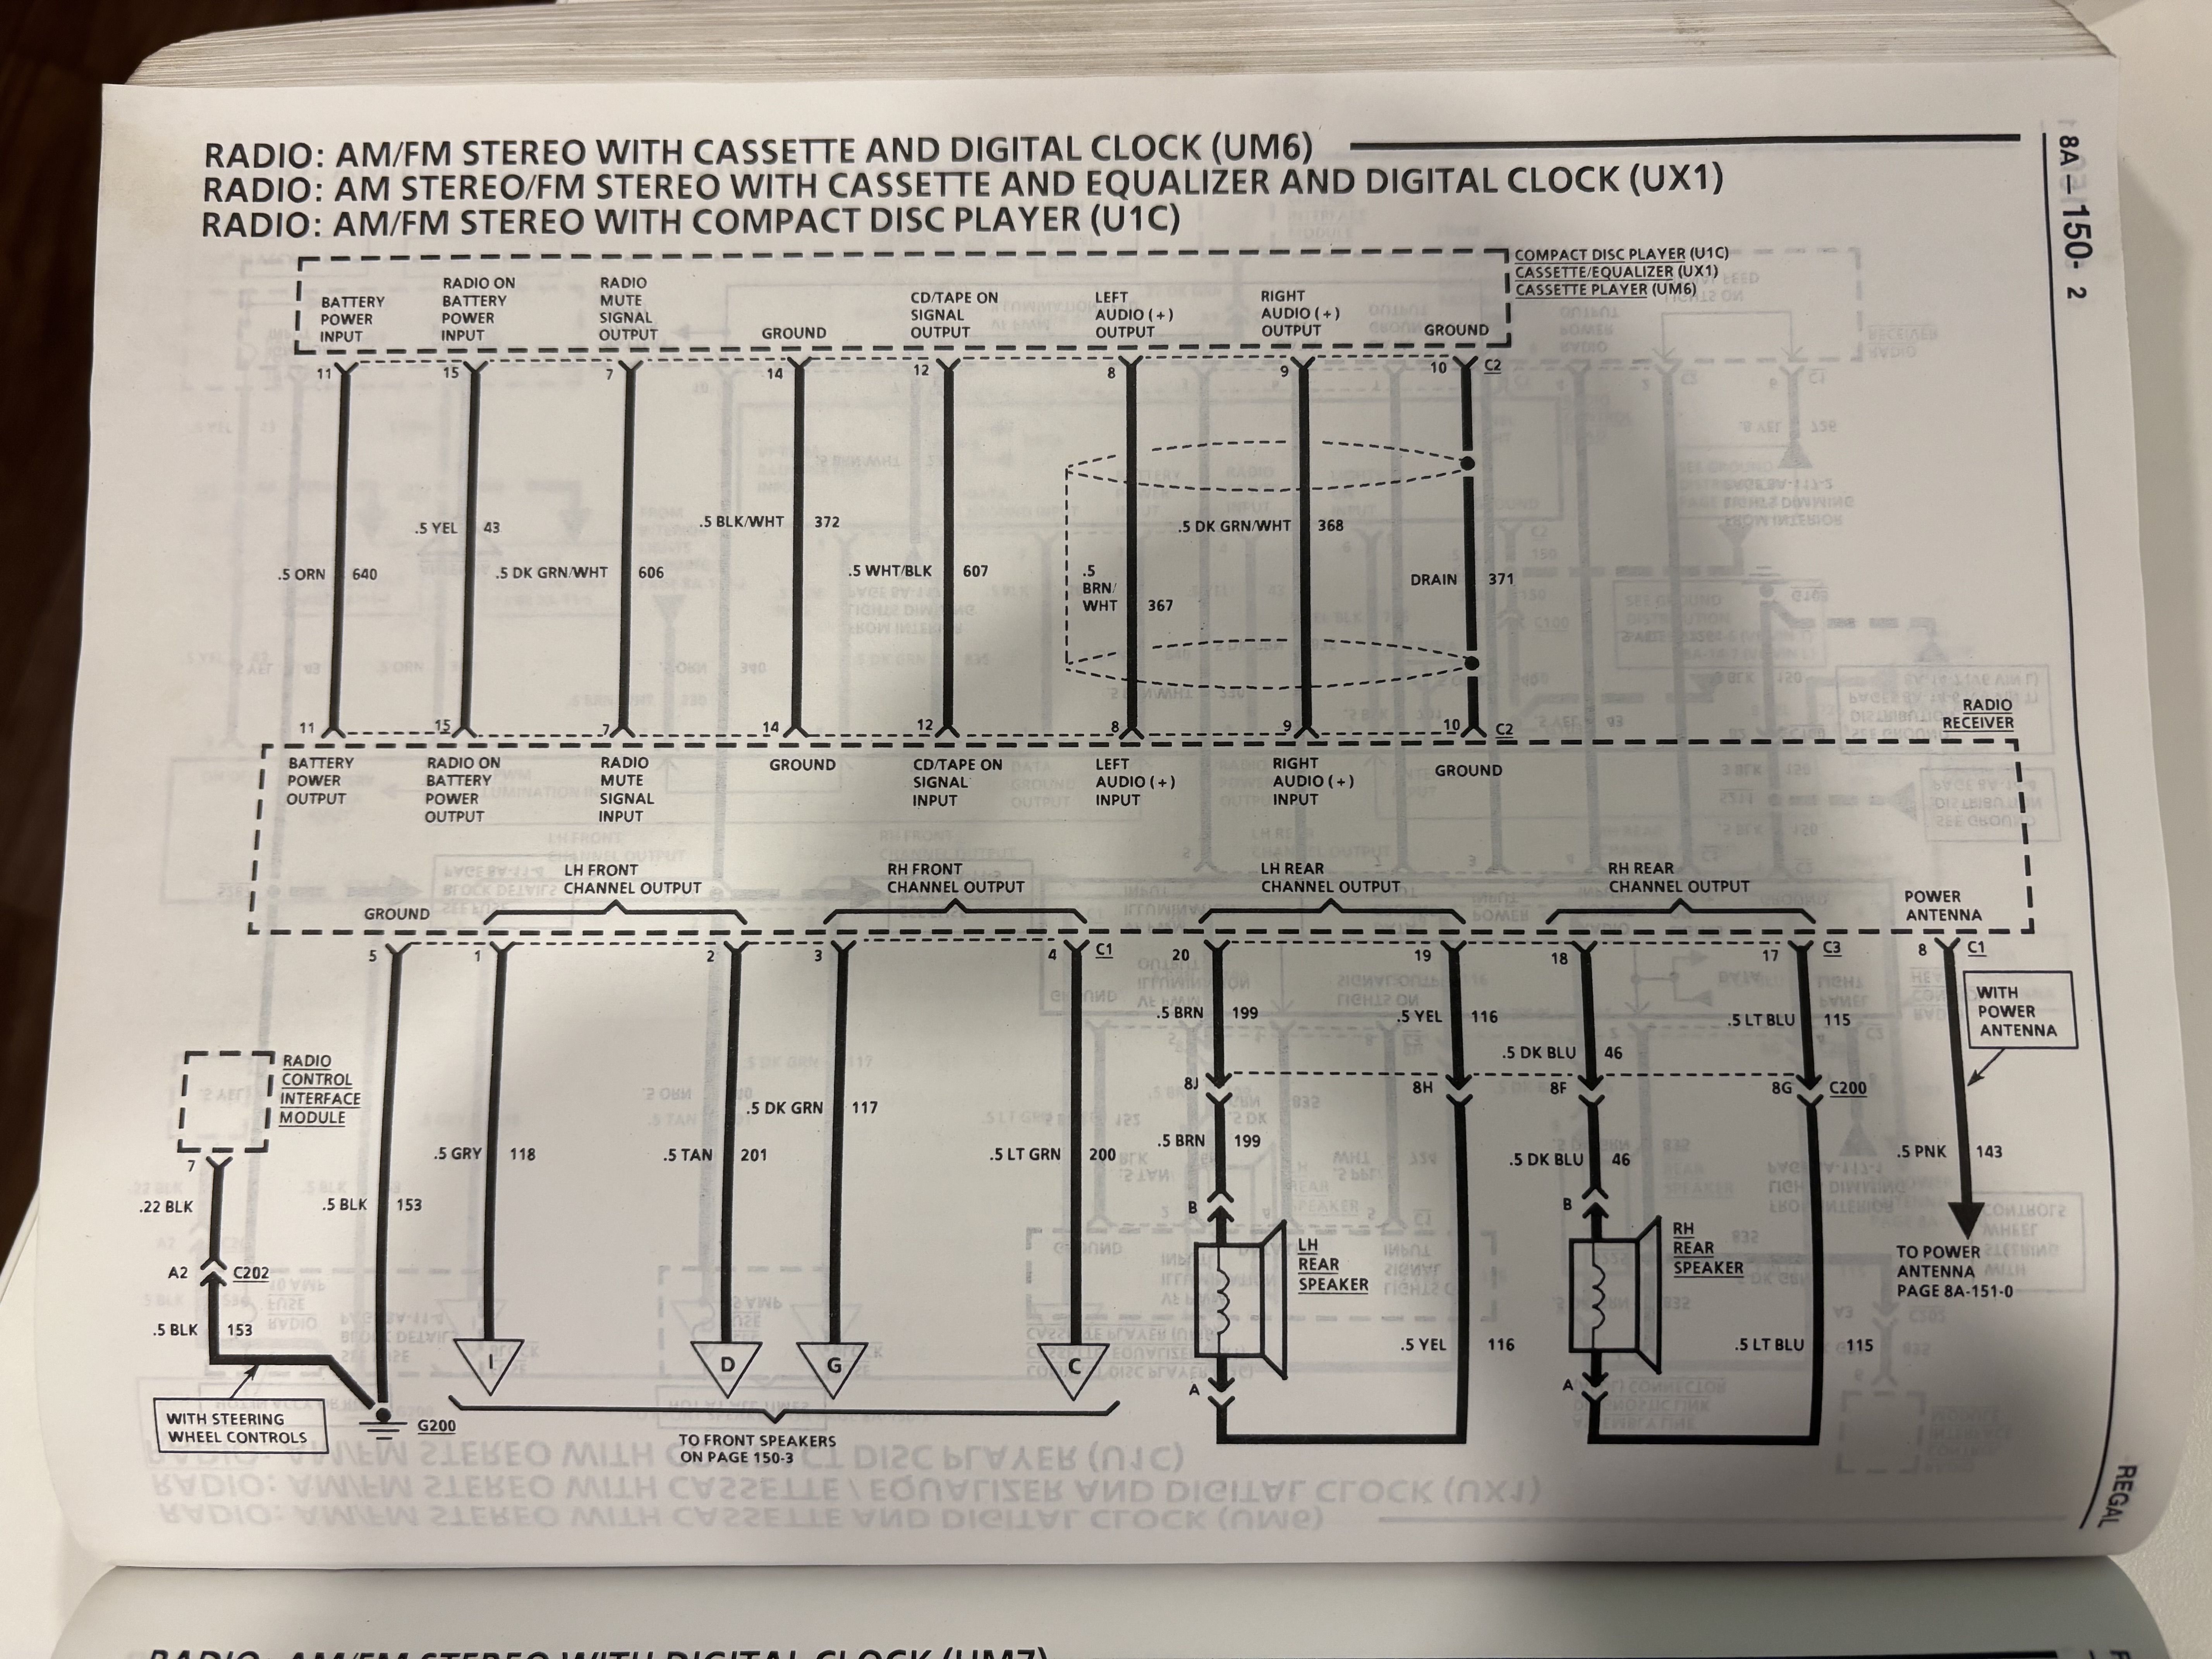
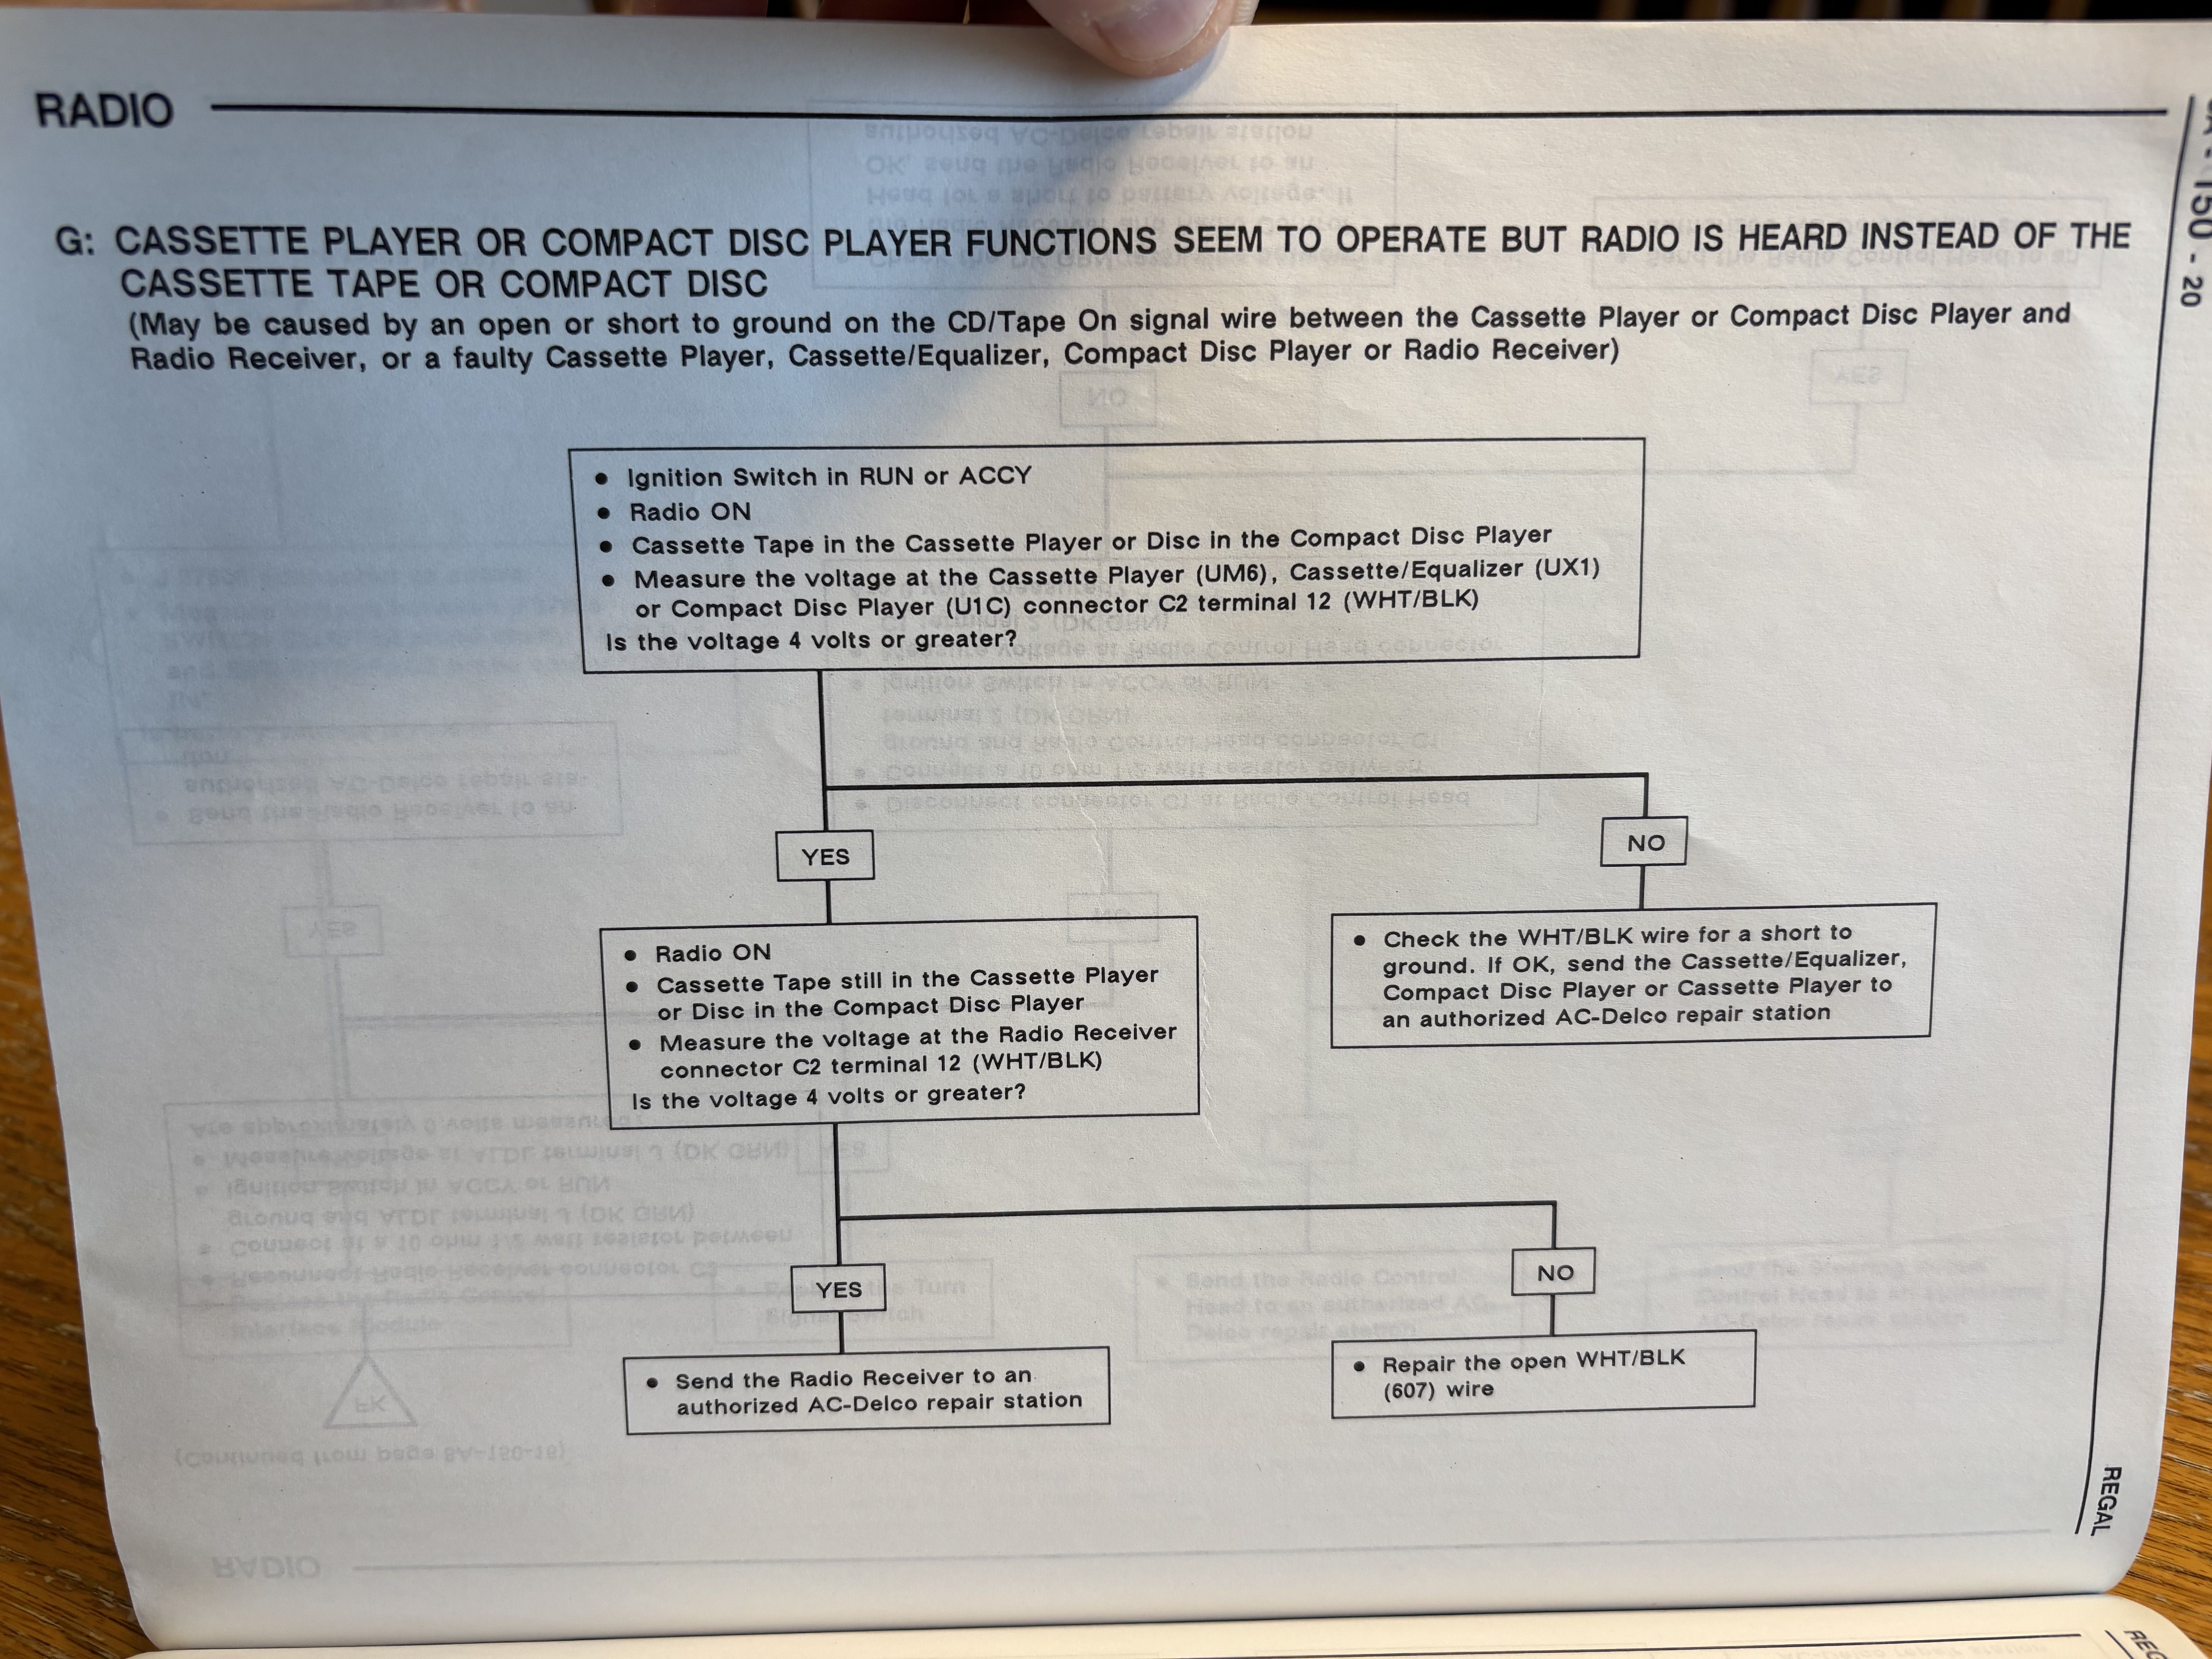
The pinouts and the functionality of the radio module is likely the same on your HU. Based on the last page, it appears that there is a 5 volt signal used (C2 pin 12) to switch from radio mode to “aux input” mode. While you won’t have the external wiring harness like the Regal does where all the mods can be done, you may be able to use the info to trace the pinouts in the display portion or the radio module of your HU in order to do it. From what I remember from having my my cutlass HU open all those years back is that there is a connector C2 like shown above going into the radio receive module from the display/tape deck portion of your HU. If there is enough room, you could potentially make all of the mods within that harness. What I can't recall though is if the wiring for that connector is in the form of wiring harness, or if it is more of a ribbon cable setup. Gotta say....looking at all of this is making me re-consider doing this mod to the Regal.
-
You're wanting to do this for the STE, right? If I remember correctly, all of the early 1st gen Ws used what is essentially the same radio module. The main difference being that some used a separate display and tape/CD deck (Regal and earlier GP), where as others had everything packaged in the form of a 1.5 DIN HU, with the radio module still being a separate, removable item. When I had my 92 cutlass, I had replaced a non-functional tape deck with one from an 88 Regal with the 5 band EQ, as it was the exact same part....just contained in a vastly different package. My Regal FSM has a section that identifies the various connecter pin outs, and also seems to imply that there is 5 volt signal used to switch between Radio and "Aux" inputs. I'll post up some of the information, as it may help in your case.
-
Mono spring delete or suggestions
Andrew T replied to Andrew T's topic in Brakes/Suspension/Steering/Wheels/Tires
SB, great vid and I'm sure very helpful to pursue that avenue . Do you have part numbers? 55.... I'm having a trusted shop do the work as I don't have the equipment. They are experienced mechanics and I'm confident can handle the job. Thanks tho -
Mono spring delete or suggestions
55trucker replied to Andrew T's topic in Brakes/Suspension/Steering/Wheels/Tires
You'll probably need some instruction on how to get the spring in & out....without the *compressor* it is a bit of a task, one has to disassemble the rear suspension to get the old one out & the replacement in. -
The tape deck definitely still works - I was just hoping for a more “integrated” solution that I know folks have done - just cant find the detail on “how”. thank you!!!