Keyless Entry: Repair for non-functional keyless entry

Sometimes the keyless entry system just doesn't work. When you press any button on the remote transmitter, nothing happens. In some cases, the keyless entry system works intermittently, but in others, not at all.

Before you attempt any repairs, verify that it is the receiver that is bad, and not the remote transmitter. If you have a spare transmitter that always worked, but now it also doesn't, then chances are, the receiver is bad. However, it would be a good idea to replace the batteries and clean the electrical contacts in the transmitter. If the keyless entry still doesn't work, one way to tell for sure if the receiver is bad, is by grounding the programming wire in the trunk. If it's working, it should lock and unlock your doors within 1-2 seconds. If it does nothing, your receiver is bad for sure. However, it can still do the lock/unlock thing and still be bad!

The cause of all your problems? Teeny tiny cracks on the soldered joints on the circuit board inside the keyless entry receiver. I believe they were not soldered all that well to begin with, and temperature variations over the years eventually caused them to crack. I think the cracks occur mainly on the solder joints of IC's (chips).

Not skilled with a soldering iron?

If you don't have the time or desire to attempt to repair your keyless entry receiver, I can repair it for you. The fix is very simple, so I will charge only $20 which will even include US Mail Priority shipping back to you which takes only 2-3 days. You will need to remove your keyless entry receiver, box it up and pack it well with plenty of padding, then ship it to me. I will then repair it, test it to make sure it's fixed, and I will ship it back to you. I am offering my services as a favor and not trying to make a living, so I offer no warranty or guarantees whatsoever. If for some reason I'm unable to fix your keyless entry receiver, I will return it to you with your money less shipping expenses. If you want to take me up on this offer, email me for more information.

Repairing your keyless entry receiver yourself is cheap & easy. If you have the tools, it's pretty much a FREE repair. The hardest part is getting the keyless entry receiver out of the car and then putting it back in (okay, that part is rather tricky). Read on to learn how to repair it yourself.

Tools Required:
Repair Instructions:

Here are my instructions for fixing your keyless entry yourself. It's actually quite a simple job and the tools to fix it don't cost much at all either. Clicking on any picture will let you view a larger version.

  1. Remove the keyless entry receiver from the car.
    To remove the receiver:
    1. Remove lower seat cushions by removing a bolt from bottom of each seat cushion(s) (2 bolts on a rear bench seat).
    2. Remove upper seat back(s) by removing nuts at bottom of the seatbacks and then lifting upwards to disengage.
    3. Remove upper 1/4 panel trim by using a trim panel remover. Remove any courtesy light(s) that may be installed on them. Use care not to apply too much force to plastic trim.
    4. Some cars may require removal of lower/side 1/4 trim panel, they are usually snapped in. Use a trim panel remover.
    5. Remove two plastic trim panel fasteners from front of rear package shelf trim panel. Use a trim panel tool.
    6. Locate keyless entry receiver module, it should be on the right (passenger) side near the speaker. It is a black plastic box with 8-wires going to it.
    7. Remove two plastic rivets holding receiver module to rear package shelf.
    8. Disconnect wire harness from receiver module.
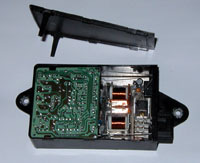
  2. Remove the top cover from the Keyless Entry Receiver module. The receiver case is snapped together. There are 6 slots on top and the protruding tabs on the lid snap into them. I used a flathead screwdriver and gently worked all the tabs out of the slots. You have to do both sides. I discovered you can't just do one side and then lift up, because there are two plastic guides that go straight down, so pretty much the lid needs to be removed by lifting straight up
    Opened Receiver Module
  3. Pull out the circuit boards by pushing out on the sides of the module near the end with the connector to disengage the snaps. While pushing out on the sides, lift up the black plastic piece that forms the panel with the connector. The circuit boards will come out with this piece.
  4. The circuit boards are coated with a clear, shiny, rubbery coating. This coating must be removed before soldering. Use lacquer thinner to clean off this coating. I poured lacquer thinner on the circuit boards, let it set a few minutes, and then took an old tooth brush and brushed off the coating. Repeat until the circuit boards are completely clean.
    These areas should be resoldered.
  5. Resolder the pins of the IC's on the larger circuit board. I believe the 14-pin IC near the edge of the circuit board is the one that has the cracked soldered joints, but for best results, I would go ahead and resolder ALL the IC's on both the larger circuit board and also the smaller one. You might also go ahead and resolder all the solder joints if you have the time. Can't hurt.
  6. Plug in the connector and verify that the keyless entry receiver is working.
  7. If your keyless entry is still not working, try grounding the programming wire and reprogram your remotes.

To date, I have only repaired 2 modules this way and no one else has reported that they've tried this fix, so I'm not sure if this is the failure mode of most keyless entry receivers. If you give it a try, let me know if it worked.